October 8, 1871 -The day the Chicago fire was started.
April 23, 1914 – The day Wrigley Field opened.
November 4, 2016 – The Chicago Cubs win the World Series for the first time in 108 years.
July 21, 2017 – The day Certified Kosher food arrived at Wrigley field.
Few things can impact the day people remember so vividly in their lives — like when something epic happens. Last Friday, Certified Kosher food finally came to Wrigley Field in the form of a Glatt Kosher hot dog stand. Adults raved and kids were excited and yes, some may have even shed a tear or two when they stepped up to the plate to order their kosher food.
There is a lot of excitement about this new venture for both the Cubs and their fans to get certified kosher food in the ball park. From Jews to Muslims (who keep strict Halal), to the health conscience, there is a new kind of dog on the block. With their tasty Romanian hot dogs and spicy Polish sausages, Danzigers will surely have people lining up to get their fill of kosher hot dogs at Wrigley.
Danziger’s kosher hot dog stand is located on the first base side, on top of section 235, in between the last two ramps leading up to the upper deck where the 400-500 sections are located. We are assuming it will be open only 6 days a week and closed for Shabbos with possibly further closings for Jewish holidays. That may change, however, so be sure to check ahead before walking into the stadium.
While still in its infancy, the simple menu consists of a Regular Romanian hot dog or a spicy Polish Sausage – which are reasonably priced compared with other inflated pricing while in the ball park. Looking to pile on a mountain of condiments and build your very own authentic Chicago hot dog? You can get grilled onions for no extra charge or decide to top it off with some mustard and relish packets. There have been some sightings of hot dog sauce (read Ketchup) but we will chuck it up to management’s oversight.
Looking for a quick snack? Be sure to grab a kosher certified pretzel here as it is the only location in the park that is certified kosher – – all other locations are not certified!
The entire kosher community is excited to hear this awesome news. But there is word that Danzigers already has competition as Milt’s food truck will be starting to serve up their famous Arietta pulled rib sandwich, but that will have to wait for another week before we can sample it. Stay tuned for more in a follow up post!
5 “Dudes” and a Vegetarian (not quite but close enough) wearing our trademark “Meat is murder…tasty, tasty murder” t-shirts!
Well, it’s been 2 weeks since competing in our first kosher bbq competition of the season, and life is finally back to normal (and I’m pretty sure we got all of the bbq stink out of everything). Our team “5 Dudes and a Vegetarian” (Daniel Peikes, Elliott Fliegelman, Debbie Burg, Robert Feiger and me), competed in the second annual St. Louis Kosher BBQ competition on June 26th! Maybe you caught our Facebook live, as Daniel Peikes, our fearless pitmaster, slathered the base rub (made by yours truly) all over the giant hunk of brisket! Well, if you missed it, be sure to check out our “Meat Your Vegetables” Facebook page! And in case it wasn’t that obvious, yes I’M the vegetarian on the team. It definitely gets a lot of laughs and no, I don’t make “vegetarian” food for the judges. Because that’s not allowed. 🙂 More on that later…
But first, let’s talk Indian food! That’s right…kosher Indian in St. Louis! Stopped there for lunch with (most) of our team to enjoy a relaxing, supper yummy meal at Gokul restaurant on Friday, after the prep. A cute place with funky colors yet a calming atmosphere, the menu seemed a little overwhelming to me, so I opted for the buffet instead. Everything was delicious – from the herbed rice, to the vegetable korma (mixed veggies with cashews and raisins in a creamy tomato sauce) to the super spicy spinach and mushroom sauce and beans and lentils cooked with mild Indian spices. No naan or paneer for me…but it was tasty and full of flavor and spice.
And now, back to our regularly scheduled programming.
For those of you who haven’t experienced the joy of kosher BBQ competitions, here’s a little rundown.
The competition has an entrance fee – anywhere between $350 – $400. That amount includes all of the protein (typically brisket, ribs, chicken and turkey), the spices and ingredients provided by the competition (like salt, pepper, garlic powder, onion powder, apple juice, olive oil, ketchup, etc…), equipment like knives, cutting boards, tongs, heat-proof gloves, thermometers, AND of course, the smoker and the grill. So, yes, you are able to bring in other ingredients, as long as they are brand new, sealed and of course they have to be labeled kosher. Typically, the prep happens either Thursday night or Friday (as the cooking gets underway Saturday night, for a Sunday event). The prep for our team? Well, for St. Louis specifically, I made all of the rubs – the base rub, which then was used to make the rub for the brisket, ribs, and turkey (our teammate Debbie, had her own special recipe for the chicken). I also made the injections (I know, sounds so dirty, right? Or maybe it sounds medicinal, but whatever the case, yes, I make sauces to then have injected into the meat. Oh baby). Meanwhile, Daniel is trimming the fat off the brisket and prepping the ribs. Debbie is making her sauces, while my husband was the gopher (he’s not allowed in the kitchen, especially with knives). 🙂 Okay, just kidding Ellie! My aunt who lives in St. Louis also came by to check out our prep and she volunteered to be our dishwasher – such a big help, thank you aunt Sue!
Okay, so by Friday late morning, all of the prep is done. Saturday night, right after Shabbat, we head over to the shul where the event was happening, get our tent (thanks to our teammate Rob for getting us set up), grab our tables and start rolling. Rubbing the brisket and getting that baby on the smoker at some point during the night. 🙂 That’s the key here – we stay up ALL NIGHT and essentially babysit the brisket on the smoker. You really need to keep an eye on that temperature – that can really make or break it!
Fast forward to Noon on Sunday – the competition BEGINS! Chicken turn-in to the judges is first, followed by ribs, turkey and brisket. And because this competition is a KCBS sanctioned competition (Kansas City Barbecue Society – yes it’s a real thing, and it’s 2 legit 2 quit, HA), there are MANY rules that are specified through KCBS, rules like no garnish, and sauces with no chunks bigger than a fine dice – are the real deal. That’s right. No sprigs of parsley in our turn-in boxes! Just the meat, in all its smoky glory.
Judging underway, and winners announced at 2:30. We’re tired, exhausted, sweaty (and reeking of smoke) and most definitely dehydrated – let’s get this thing started. So, we came in 4th place in ribs, 5th place in brisket, and 5th place overall. And out of only 10 teams, I was hoping we’d inch out by a wee bit more, but hey, it’s good practice, good experience and it just keeps us fired up for the next one. What I really love about competing in these events is the camaraderie and the great sportsmanship from everyone! We compete against novices and professionals, but at the end of the day, no one is here to sabotage one another – everyone helps each other out when needed, like borrowing ingredients, equipment, keeping an eye on other teams smokers and alerting them if they get too hot – we’re all here to win of course, but we’re all here to have fun and enjoy ourselves.
Next on our BBQ competition road trip? Kansas City in September…here we come!
Check out some highlights from the big event!
Vegetable Korma + delish Indian yumminess = HEAVEN
Ellie, did you enjoy lunch? 🙂
Picture of a picture
Sunday morning breakfast – meat ends, bfast sausage, and my homemade Shakshuka along with Debbie’s homemade mini pitot!
5th place winning brisket and burnt ends!
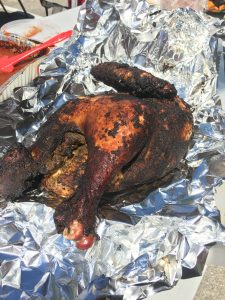
Savory smoked turkey
Sweet ‘n smoky ribs (sorry the chicken didn’t make it into the photos)!
Before we get to the fried pickles I want to say congratulations to Anita Jude of Ashland, KY. She is the lucky winner of our reCAP Mason Jar Kit Giveaway. Thanks to folks at reCap Mason Jars for providing the prize. Anita let us know how you plan on using the fermentation kit. I love a good pickle.
While we are on the topic of pickles, I had some pickle chips sitting in the fridge from my Very BBQ Purim, and some matzo meal left over form Passover and I figured why not give fried pickles a try and I was pleasantly surprised. I paired it with a spicy mayo made with my Green Fermented Hot Sauce, for a great crispy snack. It also makes a great addition to your new cook out, as an appetizer for you next casual dinner party, or a great hors d’oeuvre at a cocktail hour. It is also vegetarian friendly, and for gluten free version you can substitute the matzo meal for corn meal.
Lightly dust the pickle chips with flour with flour, making sure to shake off any excess.
Dip the pickle chips in the beaten egg.
Coat the pickle chips in the matzo meal.
Add about an inch of oil to heavy frying pan and put over medium heat. If you have a cast iron skillet this is a good time to use it. Fry on each side until golden brown.
Mix the hot sauce with the mayo and drizzle over the fried pickles. Serve immediately.
Well, Shavuot is HERE! Starting in just a few hours, to be exact. Ah, the holiday of cheesecakes. People usually assume that Shavuot is MY holiday because I don’t eat meat, but I wouldn’t be a true Ashkenazic Jew without a little bit of lactose-intolerance, am I right, or am I right? 🙂 Therefore…I’m going with a more light menu. Something a little healthier and easier on the tummy. But if you’re all in for dairy-laden cheesecakes and lasagnas, then be my guest.
For the main event…Mini Socca Pizzas! Um, excuse me?
Yes, soccas. They hail from the Provence region of France. I’m so fancy, I know. I came across an old issue of InStyle, featuring recipes from lifestyle guru and actress Gwyneth Paltrow. She featured these super easy-to-make soccas, so I’m doing my own spin on them! All it requires is chick pea flour, water, a little olive oil and salt. You can find the full recipe, along with some other entertaining tips here. And since I typically try to avoid gluten, sugar and dairy, this seemed like a perfect way to have some fun in the kitchen and experiment with my mini socca trio toppings!
And since soccas are so easy to make, you can make a whole bunch of them, big or mini, pop them in a plastic bag and freeze them – it’s easy to keep on hand in case you need a quick dinner. Just top with salad, veggies, or tomato sauce and cheese and dinner is ready in a flash.
Yes, I’m shamelessly plugging my “other” blog Riskyveggie.com for my other dishes for this Shavuot menu, so check it out and let me know what you think! And have a chag sameach!
Creamy mushroom ragout with black garlic, coconut milk, sliced radish and cilantro
And last but not least…
Dessert:
Chocolate Coconut Lime Pie – from one of my fav bloggers/cookbook authors, Elizabeth Nyland of GuiltyKitchen.com (this recipe is next on my list to re-create). YUM!
A few months back Rachel and I attended the 2017 International Home + Housewares Show. This was the second year we went, and the second year that the fine folks at reCap Mason Jars have taken time to talk to us and show us their products. They followed up with us after the show and sent us one of their super fun Fermentation Starter Kits to review and another one to give away. Fermentation in a mason jar is a great way to preserve vegetables, while giving them great flavor. If our recipe below we take it to the next level and make a bright hot sauce. Details on the giveaway are at the end of the post.
As far as the kit is concerned, it is pretty straight forward.
It comes with the following:
1-24 ounce Ball Mason jar
1-Pour lid
1-reCAP Fermenter (A waterless airlock)
1-4 ounce Ball Mason jar
1-2.5 ounce packet Himalayan Pink Salt
An instructional guide including 3 recipes
The products included all look to be of solid quality. The two mason jars included are made by Ball, which makes a quality product. the pour lid seems to be made of quality plastic and forms a good seal. The pour lid can be used for other things like salad dressings and cocktails. The airlock fermenter seem to be of good quality, but check back in two weeks when we find out how the fermented hot sauce comes out (recipe below). The pink salt is a nice touch, but really any salt would have worked. I usually use Morton Canning and pickling salt. The instructions and guide could have been a bit more detailed. I did not like the fact that they put all the measurements in volumetric measurements instead of weights. This can throw you off it you use a different size grind on your salt such as kosher salt which is much larger, or pickling salt which is much finer.
A while ago we did an un-boxing video on Facebook Live, check it out here:
What is Fermentation?
A quick primer of fermentation. Fermentation is a process where something, usually a vegetable, is preserved by exposing it to specific beneficial bacteria, yeasts, or other microorganisms. They keep other, nasty, bugs away and create a pleasant tangy flavor. This is accomplished by submerging the vegetable in a salt water brine, which keeps the harmful bugs away while beneficial ones thrive. Other herbs and spices can be added to the brine for additional flavor. The process creates carbon dioxide, this is where the airlock comes in. The airlock allows the carbon dioxide out without letting other contaminants in, so the glass jar does not explode.
I took one of the recipes that came with the Fermentation Starter Kit and put a twist on it. Below is my version of the recipe. The sauce takes two weeks to ferment, so stay tuned to see how it comes out.
This is a recipe based on the hot sauce recipe included in the Fermentation Starter Kit by reCAP. The kit includes all of the equipment you need. The original recipe is for a red hot sauce, but I had a bunch of green peppers to use up so I went off script. I also added lime juice and scallions that are not in the original recipe to put my own spin on it.
This recipe only takes about 10 minutes to prepare, but then takes 2 weeks to ferment so plan ahead. It goes great on tacos, pizza, chicken, or anywhere you want to add a little heat.
Course:
Sauce
Cuisine:
Tex-Mex
Servings: 1Jar
Author: Daniel Peikes
Ingredients
1Green Bell PepperSliced thin
2Jalapenos PeppersSliced into rounds
2Serrano PepperSliced into rounds
2ClovesGarlicSliced thin
2ScallionsSliced thin
1.5CupsFiltered Water
1tspSalt
Juice of One Lime
Instructions
Combine the salt, water, and lime juice to create a brine. Stir until the salt is dissolved.
Add all the peppers, garlic, and scallions to a mason jar, then pour the brine on top, leaving a few inches of space at the top.
Add a weight to keep the peppers below the water line. A smaller mason jar works well for this.
Let the vegetables ferment for 14 days, then remove from the brine but don't throw out it out.
Blend the vegetables slowly, adding the brine back in until the desired constancy is achieved. Store in the refrigerator and it should last for a very, very long time. (or maybe not, if you use it quickly!)
Now on to the giveaway. The fine people at reCap MAson Jars, will give on lucky reader of our blog a free fermentation starter kit. You can earn entries into the giveaway by using the Rafflecopter links below and completing the following tasks:
Subscribe to the blog via the box on the top right of screen
The giveaway will run for 2 weeks, which is coincidentally the same amount of time it take for the hot sauce in the recipe to ferment. Tune back in then and we will do a taste test to see how the hot sauce came out, and announce the winner of the giveaway. Good luck everyone and thanks for your support.
This post contains affiliate links, which means I receive compensation if you make a purchase using those links. The products being reviewed and given away were provided free of charge by reCap Mason Jars.
After Pesach (AKA Passover) everyone is a little sick of potatoes. Jicama, a large tuber from Mexico with the texture of a turnip and the flavor of an apple is a great substitute for a potato. You don’t get the same crunch as you do with a fried potato, but it is not bad for an occasional change. Originally I was going to name this post Jicama Fry Poutine Two Ways, but the recipes moved too far away from a traditional poutine, which is made with cheese curds and gravy.
Jicama Fries with Mushroom Gravy and Cheese Sauce
Kosher cheese curds can be very hard to obtain so in my dairy version I substituted a cheese sauce, and the gravy for a mushroom sauce, to keep it all kosher.
This is a great potato alternative if you want to change it up. You can try baking them instead of frying, but believe me, it won't be nearly as good.
Course:
Side Dish
Cuisine:
Mexican, vegan
Servings: 4
Author: Daniel Peikes
Ingredients
1LargeJicimaCut in to 1/2"X1/2" Fries
3tbspSeasoned SaltTo taste
Vegetable OilFor frying
Instructions
Put a large pot of water over high heat and bring to a boil. Add the fries and boil for 10 minutes to soften them.
Remove the fries from the water and dry them completely. A salad spinner works well for this.
Add vegetable oil to your largest, heaviest frying pan so it come 3/4" inch up the side. If you have a cast iron skillet this would be a great time to break it out. Put over medium heat.
Once the oil gets to 350°F start adding the fries a few at a time being careful not to crowd the pan. Fry on each side until golden brown.
Move the fries to a cooling rack, season with the seasoned salt, top with your favorite additions, and serve immediately.
1lbMushrooms (I like cremini AKA baby bellas, but white buttons will work)Stems removed, rinsed, and sliced
2largeOnionsHalved
3tbspButter or Olive Oil
3tbspAll Purpose Flour
3ClovesGarlicFinely Chopped
Additional Olive Oil for Sauteing
1tbspSoy Sauce
1CupVegetable StockPreferably home made, but store bought will be fine
Instructions
Add a couple of tablespoons olive oil to a large saucepan or a dutch over over medium heat. Add the mushrooms, being careful not crowd the pan. Work in batches if necessary. Saute the mushrooms until the are nicely browned on both sides and remove them from the pan.
Add the onion and some olive olive oil if needed. Saute the onions until they take on a golden color. Add the soy sauce and the garlic and continue to cook until the garlic just starts to brown. Then remove the onions and garlic from the pan.
Turn the heat down to low and add the flour and butter or olive oil. Stir constantly to completely coat the flour particles with the fat. This is called a roux, it is a great thickener for sauces.
Stir in the mushrooms, garlic, and onions. Then slowly add vegetable stock, stirring regularly until the desired thickness is achieved.
Serve immediately on top of fries, knishes, pasta, or chicken, the sky is the limit.
Put sauce pan over low heat and add the flour and butter or olive oil. Stir constantly to completely coat the flour particles with the fat. This is called a roux, it is a great thickener for sauces.
Continue to stir the roux constantly. Once the roux starts to brown add the milk or cream slowly and continue to stir.
Once the milk or cream is completely incorporated, add the cheese and stir the cheese until it is completely melted. Serve immediately.
Jicama Fries with Shredded Beef and Spicy Salsa Verde
For my meat version, I wanted to something that would stick the ribs, topped off with some heat. I happened to have had made some Mexican food recently and thought that this was a great opportunity to use up some leftovers. Pulled beef is a great opportunity to break out the slow cooker (AKA Crock-Pot), and as Ron Popeil always said, set it and forget it. The ingredients for the salsa are grilled, which is a great way to use up the heat from dying coals after a backyard soiree.
1Hunkof BeefNothing fancy. Neck or shoulder is fine
1BottleBeer
29ozCan of Tomato Sauce
4ClovesGarlicRoughly chopped
1LargeOnionSliced
1tbspDried Oregano
Salt and PepperTo taste
Instructions
Throw all the ingredients in the slow cooker (AKA Crock-Pot). Let it cook for about 6 hours on low. Shred with two forks. Serve as a taco, with rice, on fries. or over pasta. Freezes well.
This is a great condiment when you want to kick it up a notch. You can add more or less chili peppers to control the level of heat. You can also remove the ribs and seeds from the peppers to decrease the heat.
Course:
Dip
Cuisine:
Mexican
Servings: 8
Author: Daniel Peikes
Ingredients
2Jalapeno Peppers
2Poblano Peppers
2Green Bell Peppers
6LargeTomatillosHusks removed
1LargeOnionPeeled and roughly chopped
3ClovesGarlicSkin removed
Olive Oil
1HandfulCilantroChopped
1Lime
Salt and Pepper to Taste
Instructions
Toss all the peppers, tomatillos, onion, and garlic with the olive oil. Put them on the grill or under the broiler until the skin begins to char and then remove from the heat
Remove the tops from the peppers and add them to a large mixing bowl along with the onion, tomatillos, and garlic. With an immersion (stick) blender, process until desired texture is achieved. This can also be done in a food processor or a regular blender.
Add the cilantro, salt and pepper and the juice from the lime to bowl. Stir to combine. Serve alongside chips, or on top of tacos or fries.
Welcome back from the Passover craziness! It feels like the Seder meals were forever ago, am I right? Well, back to the swing of things, and this latest challenge ingredient is “Jicama”, also commonly known as a Mexican turnip. I think it tastes somewhere in between an apple and a potato. I love the versatility of the humble jicama – you can eat it raw or cooked and it’s such a neutral base, it’s good in so many dishes.
I had a few dishes running around in my head and tested a few things out, but what I started with was a quick pickled jicama – let that sit in the fridge for a day or so until I figured out my next move. Just apple cider vinegar, water, salt and coconut sugar (since, if you know me, I don’t even have white sugar in my pantry. I know, I know…I’m one of “those” people). Diced it up, poured the brine in a mason jar and let it do its job. Then, it was on to some inspiration.
Over Pesach, my mother-in-law showed me a new cookbook she got, “Perfect for Pesach” by Naomi Nachman. Truth is, this is basically what I eat all year-long! Gluten free, but definitely still delicious, I mean, who are we kidding. I was really digging it, so I got a copy for myself (can one have too many cookbooks? I think not)! I came across a coleslaw with chimichurri and that got me thinking about my jicama dish. But immediately, my mind went to salsa verde (green salsa). So, I got some tomatillos (they look like green tomatoes with a papery skin on the outside), some jalapeno AND Serrano peppers (because you know, I live on the edge – maybe that’s another reason why I’m “risky” veggie, aye?), some green onions, garlic, olive oil, sat and pepper. Broil for about 10 minutes until everything is slightly charred and piping hot and now you have a sudden craving for chips and dip. Blend it all in a food processor and BAM. Salsa verde. I’ll warn you, it does have quite a kick, but you can always remove the ribs and seeds of the peppers before blending away. But I like it spicy baby!
So that’s that! I mixed some bagged coleslaw (because I’m not afraid of using shortcuts), sliced radish, pickled jicama, and fresh cilantro (and if I COULD, I would sprinkle cilantro on freaking everything – yea, I’m one of those weirdos that somehow doesn’t think it tastes like soap). And to mellow out the heat of the salsa verde, I mixed in some homemade mayo, but you can always use store-bought, don’t worry, your secret’s safe with me. 🙂
Fresh, light, spicy, crunchy – now THAT sounds like a perfect spring dish if you ask me. I served this slaw as a side dish to my Moroccan salmon and carrots – look for that recipe coming soon on my other blog, riskyveggie!
And coming up…my light take on Shavuous food! (say WHAAA?)
When it comes to Passover (AKA Pesach), most families have more traditions than Fiddler on the Roof. I was all set to make you a super traditional matzo ball with homemade chicken schmaltz and gribenes. I figured this was going to be an easy challenge to beat Rachel at. How could a vegetarian gluten free dish beat (to quote Walter from The Big Lebowski) “…three thousand years of beautiful tradition, from Moses to Sandy Koufax”. So I spent hours slowly rendering chicken skin to extract some liquid gold and produce crispy little chicken skin cracklings, and then…and then one of my kids spilled my schmaltz. All over the kitchen floor. Needless to say, I was not happy.
That is when I went in to problem solving mode. What do I have in the house that is similar to schmaltz? That is where I completely broke with tradition and went to one of my favorite crutches, (kosher) bacon. Ask your Bubby, there ain’t nothing traditional about bacon. That being said, it does provide fat and crunch just like schmaltz and gribenes.
Let me know what you think of the recipe in the comments. Also, let me know if you like my matzo ball soup or Rachel’s better. You can find hers here: Minestrone Soup with Gluten-Free Matzah Balls
A classic kosher comfort dish. It's good for what ails you, they don't call it Jewish penicillin for nothing. I don't like anything too fancy in my chicken soup so I stay away from things like zucchini and tomatoes, but if you like them feel free to add them, it won't hurt anything.
One final note, your soup will never taste as good as your mother's for 2 reasons:
1. Memories are a strong force
2. She probably added some soup mix with MSG to give it that little something extra.
Course:
Soup
Cuisine:
Jewish
Servings: 1Large Pot
Author: Daniel Peikes
Ingredients
4MediumCarrotsPeeled and cut into 1 inch rounds
4RibsCeleryRinsed, tops and bottoms cut off and cut into 1 inch pieces
1LargeSweet PotatoPeeled and cut into chunks
1TurnipPeeled and cut into chunks
1ParsnipPeeled and cut into 1 inch rounds
1OnionPeeled and roughly chopped
SaltTo taste
PepperTo taste
1HandfulDill
1HandfulParsley
3Bay Leaves
4Chicken Leg QuartersRemove and save the fat and skin to make schmaltz
Instructions
Put all the ingredients in your largest pot and fill with enough water to cover everything, making sure not to fill too high in order to prevent it from boiling over.
Cover the pot and put over high heat and bring to a boil. Once the soup is at a boil remove the lid and turn the heat down to a simmer.
Let the soup simmer for about four hours or until the soup reduces by about 15%.
Remove chicken from the bones, adding the chicken back in to the soup and discarding the bones. Serve within a week or freeze for up to six months.
2tbspFat(Kosher) Bacon grease, chicken schmaltz, or vegetable oil
1LargeEggBeaten
2tbsp(Kosher) Bacon or GribenesChopped very fine
2quartsChicken StockFor cooking the Matzo Balls
Instructions
Add all ingredients except the 2 quarts of chicken stock in a large mixing bowl, stir with a large wooden spoon, ideally one passed down from your Bubby, until all ingredients are thoroughly combined. Put the mixture in the fridge for about an hour to hydrate.
Roll out the matzo balls just slightly smaller than a golf ball and cook in chicken stock for about 5 minutes. Serve immediately or remove from liquid and freeze.
Ah, the dreaded “P” word. The word that we Jews cringe when anyone utters it before Purim. Yes, I’m referring to “Pesach”! HA! It’s not that overwhelming, is it? (Insert shoulder shrug emoji here). And so it begins. Searching, sweeping, and cleaning out old, weird stuff from the fridge (you know, the stuff you forgot to label, some unidentifiable mushy substance that now has a fresh layer of fuzzy mold?) Alright, enough of the gross stuff. You are reading about food here anyway.
Quick disclaimer: Some of you may notice that I have included peas in this recipe. Peas are “kitnoyit” and only eaten by Sephardic Jews on Passover, so if you’re Ashkenazic, then peas are off limits. So feel free to omit, if it applies to you.
So this week’s challenge is none other than the traditional “matzah ball” (or matzo ball as it’s most commonly spelled). Being, well, me…I wanted to take on the challenge to make mine gluten free, and before you get all annoyed with me that I may not making true matzo balls, here me out for a second. Call them whatever you want, but basically these are big gnocchi, and trust me…they turned out pretty delicious if I say so myself. So no haters here…just wanted to try something different while still appealing to everyone. I must admit, I had to do some research here. Survey says – use potatoes as the base. I went with yukon gold potatoes, mostly because I like the flavor, and when they cook, they get this super creamy consistency that I don’t think you can really get from a big baking potato, and no peeler necessary (though honestly, I hardly ever peel potatoes). The other thing I realized while doing some searching on the interwebs, is that you MUST wait for the potatoes to cool before making the dough (so, insert extra prep time for that). I didn’t ask questions, I just followed along.
Then came the hard part – what type of soup would I make? I briefly thought about “tortilla soup”, sans tortillas, but using the matzah balls as a replacement, but my gut told me to go with a simple minestrone. It’s a week before Passover and aren’t we all trying to get rid of random items in our fridge? Many of us probably have canned tomatoes, onions, garlic, carrots, frozen peas, right? This is basically a “dump soup” as I like to call them – just dump everything into a pot and call it a day. That’s the beauty about making soup, you can throw in whatever you want and adjust seasonings as you go, it’s almost fool-proof. Plus…since these matzah balls are basically gnocchi, why not make an Italian-influenced soup, right? I’m not trying to change the world here with my out-of-the-box and totally inaccessible recipes that no one will make it.
Before I go, I have 2 tips for you (and one bonus tip in the recipe below), because you KNOW I’m all about handy tips, ya! So I used a can of whole peeled tomatoes for this and I happen to love these vintage-looking cans, so don’t throw them out (or recycle for that matter), instead use it as a low vase for flowers!
Tip number 2? I made veggie stock a few months ago and froze it in ice cube trays (I have a few weirdly shaped ones, some heart-shaped, some stick-shaped, but who cares), then instead of buying veggie stock for this soup, I just popped in a few veggie stock cubes and you’re done. I kinda eyeballed the measurements, but feel free to play with it as you make it! I added a lot of water and stock because I didn’t want it to end up being tomato sauce. So start with some water and you can always add more. Don’t have stock around? That’s fine too, just add enough after and make sure you season with plenty of salt, pepper, and whatever else you have on hand. The sky’s the limit! Don’t have peas? Throw in some sliced button mushrooms! Make it your own!
One other thing to add. If you’re like me and want to multi-task, let your slow cooker be your friend in this scenario! I didn’t want to babysit my soup, so instead I dumped everything into my crock-pot, and cooked it on low overnight. I made this for Friday night dinner, so all I had to do was put it back on the crock pot and re-heat it. Don’t you love when your kitchen appliances can do the work for you? But obviously you can make it the old fashioned way too.
So that’s it, here we go! 1 week and counting. Wishing you all a chag kasher v’sameach and a wonderful Pesach with family, friends and hopefully LOTS of good food. 🙂
2tspgarlic powderI roasted some garlic with the potatoes and I added the garlic to the soup, but you can use garlic powder, that's totally ok 🙂
Minestrone Soup
128 ozcan of whole peeled tomatoes
2small white onions, chopped into large pieces
110 ozbag of frozen green peas
110 ozbag of frozen carrotsyea, I was feeling pretty lazy here, just being honest.
3stalkscelery, choppedoptional (I didn't use any because I just used up whatever I had in the house)
1cupbutton mushrooms, slicedalso optional,
1tspextra virgin olive oil
3clovesgarlic, minced
2cupsveggie stock
3cupswater
Instructions
Make the soup - in a large soup pot, sweat the onions, garlic, celery (if using) carrots and mushrooms (if using) for about 10 minutes, season with salt and pepper.
Open the can of whole peeled tomatoes and carefully (wearing an apron is a must here), use your hands to crush the tomatoes while in the can, so they're not quite as "whole" but a little more rustic.
Add in the can of tomatoes, frozen peas, stock, water and any other spices or seasonings (thyme, bay leaf, dried basil)
Turn the stove to high and cook until the soup is boiling, then turn down the simmer, cover and cook for another 30 minutes, stirring occasionally.
While the soup is cooking, add the matzah balls ingredients to a food processor and blend until smooth. You may have to add in a little more flour if the dough is still too sticky but depends on how starchy your potatoes are, or if you're using extra large eggs. Knead the dough in a big stainless steel bowl until you get the perfect consistency (you want to be able to roll them in your hands, so not too sticky but sticky enough that they hold together).
Fill a second soup pot with water and bring to a boil.
(Tip #3): Use a mini ice cream scoop to portion out the matzah ball dough and drop in to the boiling water.
Cook for a few minutes, until the balls float to the top.
Remove the matzah balls with a slotted spoon and drop them into the minestrone soup to finish cooking.
Serve the soup piping hot with fresh basil or dill and enjoy!
Before you ask, yes you can may this with any type of bacon and eggs, it does not need to be lamb bacon or quail eggs. I happened to have some excellent lamb bacon from CWS Meats and I also managed to find a local small chain grocery store that regularly carries kosher quail eggs. I figured a kosher bacon and egg change would be a great one for me and Rachel.
Lately it has been wet, cold and gray in Chicago so I was craving something warm and hearty. As we are getting close to Passover I did not want to buy any new ingredients, so I rummaged through my fridge and came up with this shakshuka recipe. Shakshuka is generally made by simmering vegetables in a tomato sauce, and then carefully adding whole eggs and cooking they until the whites are set and the yolks are just warmed through. Chili peppers are often added to the sauce to give it a kick.
This recipe can easily be scaled up and down for more people, or for that matter the size of your pan. This recipe comes out wonderfully in cast iron skillet, but a saute pan or a large frying pan will work in a pinch.
Slices of Pickled JalapenosFor garnish if you like it hot
Torilla Chips
Instructions
Put a large saute pan or cast iron skillet over medium heat. Add the bacon and cook until crispy. Remove the bacon, keeping the fat in the pan.
Add the ground beef and cook until completely browned. Remove the ground beef, again leaving the fat in the pan.
Add the onions and cook until the start to brown. Add the peppers and mushrooms and cook until the also start to brown.
Add the tomato sauce, cooked ground beef, and Italian seasoning. Bring to a simmer.
Carefully add the eggs one at a time, being careful not break the yolks. Let the eggs cook in the sauce until the whites are set and the yolks are warm.
Sprinkle on the bacon and garnish with the jalapenos and tortilla chips. Serve immediately.


 Before we get to the fried pickles I want to say congratulations to Anita Jude of Ashland, KY. She is the lucky winner of our


 A few months back Rachel and I attended the


 Jicama Fries with Mushroom Gravy and Cheese Sauce


 Welcome back from the Passover craziness! It feels like the Seder meals were forever ago, am I right? Well, back to the swing of things, and this latest challenge ingredient is “Jicama”, also commonly known as a Mexican turnip. I think it tastes somewhere in between an apple and a potato. I love the versatility of the humble jicama – you can eat it raw or cooked and it’s such a neutral base, it’s good in so many dishes.

 When it comes to Passover (AKA Pesach), most families have more traditions than Fiddler on the Roof. I was all set to make you a super traditional matzo ball with homemade chicken


You must be logged in to post a comment.