Vegan Nacho “Cheese” Dip

I can confidently say this is one of the most talked about recipes I’ve ever made. My Vegan Nacho Cheese Dip is most definitely a crowd-pleaser but yet this humble dip has so many stories surrounding it. Let’s get into it!

Crowd-pleasing surprise

First off, I have to give my other blog (riskyveggie.com) some props because I posted a version of this recipe a few years back, since it was such a huge hit. I’ve made it for Super bowl parties in the past and it’s always fun to see the look on everyone’s faces when they see a “cheese”-looking dip on the same table as the chicken wings. Hmm…doesn’t look so kosher to me. But when I told them it’s vegan? Not to toot my own horn, but pure amazement on everyone’s faces.

The second time I made this dip for a crowd was last year’s Super bowl party. It was right before Ellie and I moved into our new condo and somehow I mustered up enough energy to whip up a batch of this dip. It’s THAT easy, that it didn’t feel like a chore. We went to a friend’s house to watch the game and their teenage son could not get enough of this. So much so that every time I see their family, there’s a good chance that one of them will ask me when I’m making it next. Well, Gottesman fam, this is for you.

Performance Recipe?

In October 2021, my little sister got married. It was an unbelievably magical weekend. Sunday night (the night before the wedding), there was a dinner and an activity called “Share” – basically like a talent show! There were lots of fun performances – jokes, songs, dances, funny stories and lots of laughs. I hadn’t planned on performing anything for share but about 20 minutes before the program started, a friend said “why don’t you share a recipe?” I looked at her quizzically, “um, how exactly would I do that? I’ve never “performed” a recipe before.”

But I decided super last minute to participate and the first recipe that came to mind was my infamous Vegan Nacho Cheese Dip. This is probably my most-requested recipe (apart from my Coconut Date Balls).

So, I mustered up some courage, jumped up on stage to “perform” my recipe! Wow, everyone was so into it! Maybe because it was a little different and unusual for a talent show? Either way, it turns out, this recipe is the perfect one to “perform” – all I did was share the ingredients and mimicked the action of my blender whirling away! But, the fun part is that I had several people approach me afterwards comment on how delicious (and easy) it sounded and of course, they wanted to know where to find the recipe! Cue a plug for MYV!

Well, look no further, my long-awaited Vegan Nacho Cheese Dip. I promise, it won’t disappoint.

Happy blending!

0 from 0 votes
Vegan Nacho "Cheese" Dip
Servings: 4 cups
Author: Rachel Katzman
Ingredients
  • 1 Large handful of raw cashews You don't want roasted or seasoned, just buy the raw whole or pieces (in bulk is cheaper) - and store in the freezer to keep them fresh
  • 4 cups Filtered water
  • 4 tbsp Nutritional Yeast
  • 1/2 cup Salsa
  • 2-3 Garlic cloves No need to chop, the blender will do all the hard work for you!
  • 2 tbsp Turmeric
  • 1 can Diced green chilies Optional
Instructions
  1. Add the cashews to the container of a high-powered blender. Add the water and the rest of the ingredients, except the diced green chilies

  2. Slowly power up to the highest setting and let it blend for about 6-7 minutes. The key here is to be patient. You need to let the blender do its job, so it'll be loud but trust me, it's worth it

  3. After about 6-7 minutes, you should hear a slight "chugging" noise and the sauce thicken and tighten up. Lower the speed to the medium speed for 1 more minute

  4. Turn off the blender and slowly pour out the sauce into a large container. Careful, it's going to be HOT! Add in the green chilies and serve!

  5. If you're going to be serving this for a party, I recommend serving it in a slow cooker on low to keep it warm and clump-free. Store in the fridge and use for up to 1 week. Serve with tortilla chips! (Note - this recipe is one of those things where you really don't need to measure. I put in rough measurements here, but you can always taste half-way through the blending process and adjust. One time I wanted to make this for a party but didn't have any salsa, so I substituted spicy red harissa and it was incredible. The perfect amount of heat and spice. So play around with it. Add in some lemon juice for a tang, or add in pickled jalapenos once it's mixed, or even pour in some of the juice before you blend! You can also omit the salsa and turmeric and add in more garlic and almond milk (like half almond milk, half water) to make a vegan alfredo sauce. It's the perfect base to make lots of yummy vegan sauces!!)

Cheeseburger Salad Bowl

Cheeseburger Salad Bowl

For those of you in the Keto or Low-Carb community, you know full well what a “Big Mac Bowl” is. This is my spin – a KOSHER take on this classic keto dish, made with my homemade “Big Mac sauce” – the Cheeseburger Salad Bowl!

Low-Carb goodness

I’ve been following a low-carb eating lifestyle for several years now but I’ve lately more strict when it comes to tracking my macros. This salad is easy to prepare in advance for lunch or dinner and it’s incredibly filling and satisfying – even for a salad! It’s become my “several-day-of-the-week” meal and I haven’t gotten tired of it yet.

Even if you’re not following a low-carb lifestyle, this is the perfect salad to jazz up your weekday lunches with the perfect balance. The combination of healthy fats veggies and protein – the sharpness of the red onion, the sweetness of the tomato, the “meaty” veggie burger, and the tang of the pickles and the dressing. Topped with sesame seeds, to mimic the bun – YUM.

Simple swaps

Want to make your salad prep even easier? Buy shredded lettuce, or meatless crumbles (and cook the night before). I like using the burger patty so it’s easier to track my macros and it’s the perfect protein serving of 1 for my Cheeseburger Salad Bowl. This would also be great with shredded coleslaw mix, or chopped romaine, or kale too.

And we can’t forget about the main star here – the Big Mac Sauce! It’s so ridiculously simple – enlist your kids to help make it! I just add everything in a mason jar and store it in my fridge to last about one week. Oh and it also makes a delicious tangy dip for French fries too!

Enjoy!

0 from 0 votes
Cheeseburger Salad Bowl
Prep Time
10 mins
Cook Time
10 mins
 
Course: Salad
Servings: 1 serving
Author: Rachel Katzman
Ingredients
  • 1 Meatless Burger Patty You can use either Beyond Meat or Impossible Burger - delish! You could also use any veggie burger crumbles. I like using the patty and crumbling it up as it cooks, so it's the perfect protein portion!
  • 1 cup Iceberg lettuce, shredded
  • 1/4 cup Cheddar cheese, shredded
  • 1/4 cup Cherry tomatoes, sliced
  • 1/8 cup Red or white onion, diced
  • 5-6 Pickle chips, chopped I like the giant container of Grillo's pickle chips from Costco!
  • 1-2 tbsp "Big Mac Sauce"
  • Sprinkle of sesame seeds
Big Mac Sauce
  • Mayo
  • Ketchup
  • Yellow mustard
  • Splash of pickle juice
Instructions
  1. Heat a sauté pan on medium heat and cook the veggie burger on both sides. Break up the meat patty with a wooden spoon until it resembles ground beef crumbles. While the burger cooks, make the big mac sauce

  2. There's no exact science to this - just mix the mayo, ketchup and mustard together in a small bowl or mason jar, and add in a bit of the pickle juice. I start with about a 1/4 cup of mayo and add a big squeeze of ketchup and mustard, add in the pickle juice and adjust as needed. It makes about a cup of dressing and lasts in the fridge for about 1 week

  3. Assemble the salad bowls: In a big bowl, add in the shredded lettuce, onion, tomato, cheddar cheese, (slightly cooled) crumbled up veggie meat patty, and chopped pickles. Top with the big mac sauce and sprinkle with sesame seeds. Enjoy!

Check out some more salad recipes here:

Watermelon Tomato Salad

Blistered Green Bean & Tomato Salad with Basil Garlic Dressing


Tomato Pomegranate Salad


Israeli Shawarma Feta Salad


Herby Cabbage Salad – perfect for Passover!


The Cheese Board: Beginner, Intermediate, and Expert Level

Charcuterie boards seem to be all the rage these days. While we have already covered making large meat-based charcuterie boards, with the holiday of Shavuot approaching and its concentration on dairy, I figured it was time to address how to make a smaller cheese board. This is one of those times were the quality of the ingredients really makes a difference. As cheese boards are fairly simple, you cannot hide behind technique. When I am looking for high quality cheese that is beyond the basics, I go with The Cheese Guy. No, they are not sponsoring this post but I really do believe they carry some of the best cheese on the kosher market, available in the US. (Of course if they wanted to work something out, I would be happy to work with them. Brent Delman, have your people call my people).

I created three options, allowing you to tailor your experience around how how courageous you are, and how many people you are.  Each level will be provide a “center of the plate” cheese” along with a some supporting cheeses and some an accoutrement to round things out.  I plated each one on a bamboo cutting board, but any nice tray should work. Finally, what is a cheese board without wine? I have included The Cheese Guy’s recommendation for each of the “center of the plate cheeses as I am definitely not a sommelier.

Beginner Level Cheese Board

Beginner Cheese Board

We start out with something dry, something soft, and something goat:

Asiago shaved into thin strips with a vegetable peeler. I think of asiago as parmesan’s funkier cousin.

Gouda, a creamy soft cheese, cut into cubes. This one is a great melter, for your next grilled cheese or mac and cheese.

For your “center of the plate” cheese go with a whole log of Classic Goat Cheese (drizzled with honey if you want to be fancy). If you like cream cheese, but you want to take it to next level, goat cheese is where it’s at.

Serve with Ritz-style snack crackers and little jam on the side. I like a good strawberry jam, but raspberry or fig would also work nicely.

As far as wine in concerned, to go with the goat cheese, the fine folks at the Cheese Guy recommend a Sauvignon Blanc

Intermediate Level Cheese Board

Intermediate Cheese Board

We are going to take everything from our beginner level board and add the following:

For your “center of the plate” cheese, we are going to introduce some sliced fresh mozzarella. Drizzle with a balsamic reduction or some good olive oil if you want to be fancy.  This comes in a ball or a log and can be a little tricky to slice. Make sure and use a good, sharp knife.

I am also adding a Raw Milk Vermont Artisan Cheddar, sliced thinly, for a little sharpness.

Upgrade your cracker game by adding something with a little more texture and flavor.  One of those mixed party packs that comes with several varieties in different shapes is great for this application along with some mixed nuts for some texture and earthiness to cut the richness of the cheese.

The fine folks at The Cheese guy recommend White wine, pairing the mozzarella with Pinot Grigio.

Expert Level Cheese Board

Expert Cheese Board

For our expert level we are going to take everything from our intermediate level and add the following:

For your center of the plate it is time get in to something runny, the Vermont Bloom Brie Style cheese*. Brie is generally served at room temperature or warm. (You can also hit this one with honey is you want be fancy, or just use the jam.)

And as if weren’t funky enough we are going to add feta* cheese, for its briny flavor and crumbly texture.

Add some dried fruit and instead of crackers we are going to up our game with crostini.  For those of us who don’t speak Italian, those are “little toasts” made from a baguette sliced on a bias and placed under the broiler until lightly browned and the edges just begin to char.

Finally, it is time to break out the bubbly for this one. Pour yourself a flute of some Champagne or Prosecco.

This should just be considered a guide in your journey through wide world of cheese.  Feel free to make a cheese board your own. Prefer blue cheese to feta, go ahead and switch it out. If you want to add some fresh fruit to your board, grapes and sliced melon are a welcome addition.

What’s your favorite type of cheese? Let us know in the comments.


*Note that these cheeses are being played by their understudies in this picture as due to poor planning on my part I was unable to get the official “The Cheese Guy” version.

Sausage, Egg & Cheese Casserole

Sausage, Egg & Cheese Casserole

Hello friends! And almost Happy Shavout! Now, I know the title of this may may sound a little odd, but don’t worry, I’m using meatless meat here, specifically the Beyond Meat, to make this awesomely-easy Sausage Egg & Cheese Casserole, your newest savory dairy kugel for the upcoming holiday!

Spin on a classic breakfast Sandwich

If you’re not into using the parve meat, you can most definitely make this without it, but it definitely amps up the flavor and makes this a hearty side dish, otherwise, you’re just doing well, egg and cheese. Although there is nothing wrong with that combo.

For this year’s Shavuot recipes, I’m aiming for something easy. A throw-in-the-oven and don’t-think-about-it kind of dish. This casserole is just that. I browned the Beyond Beef on the stove, adding some salt, pepper and cumin. breaking it up with a wooden spoon until it was crumbly like sausage. Then I whisked the eggs, cream, garlic, salt and pepper in a bowl. I added the “beef” into a greased pan, topped with cheddar cheese and poured the egg and cream mixture on top. I also added in some pickled jalapenos just for fun. But that’s optional!

Leftover Magic

The great thing about this casserole, or kugel is that it’s great hot, room temp or even cold. It reheats well and you can even freeze leftovers!

What’s even more fun? Reheat this (at 325 for about 10 minutes) for the last days of yomtov, toast up some bagels and cut a few pieces of this casserole into thin slices and you’ve got yourself a “sausage, egg & cheese bagel”.

Chag Sameach! Now, let the dairy fest begin!

Want some more Shavuot recipes? Check out some past posts from Meat Your Vegetables here:

0 from 0 votes
Sausage, Egg & Cheese Casserole
Prep Time
10 mins
Cook Time
35 mins
 
Course: Brunch, Side Dish
Servings: 12 servings
Author: Rachel Katzman
Ingredients
  • 1 16 oz. Package of Beyond Beef If you have parve "sausages" like the Beyond Meat Sausage, those would be delish here! Just chop 'em up!
  • 8 Large Eggs
  • 1/4 cup Heavy Cream
  • 1/2 tsp Salt
  • 1/2 tsp Pepper
  • 2 Garlic cloves, minced Or, I "pressed" them through my microplane zester. So much easier than mincing!
  • 1 handful Pickled jalapenos Optional, or add in fresh hot peppers if you have them! You could also add thinly sliced red onion, green pepper, or mushrooms
  • 1 cup Cheddar Cheese, shredded
  • 2 Green onions, thinly sliced For garnish
Instructions
  1. In a medium-sized skillet, brown the beyond beef. Use a wooden spoon to break up the meat into small chunks, like sausage. Add 1/4 salt and 1/4 pepper and cook for about 10 min.

  2. Pre-heat oven to 350F.

  3. While the meat is browning, crack the eggs into a medium/large bowl. Add in the cream, garlic, salt and pepper.

  4. When the meat is done, add it to a greased 9.5 x 9.5" pan.

  5. Sprinkle the cheese over the "sausage" then add in a handful of pickled jalapenos and pour the egg and cream mixture.

  6. Make sure the cream mixture is incorporated into all nooks and crannies of the casserole. You might need to use your hands to make sure all spots are covered, but it doesn't have to be perfect.

  7. Bake for 35 minutes.

  8. Let the casserole cool, then cut into squares and garnish with sliced green onions. Enjoy!

Super Bowl Snacks: Cheddar Stuffed Jalapeno Hush Puppies

Melted Cheddar

Hush Puppies
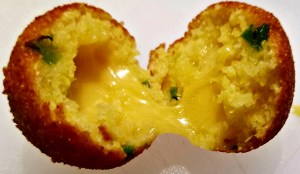
I was trying to come up with a great bite for the Super Bowl and  I toyed with the idea of doing a stuffed pretzel,  I was all ready to make pretzels using lye, but decided I needed something a little more approachable.  I wanted something quick to make and easy to eat. I rummaged through my fridge and pantry and came up with hush puppies, or fried cornbread balls. There is one thing you do need to be careful about on this, make sure your oil is not too hot. If the oil is too hot, the outside of the hush puppies will burn before the inside cooks and the cheese melts.  I know I have been leaning on cheddar and jalapeno lately, but for the Super Bowl it seemed appropriate.

5 from 1 vote
Hush Puppies
Cheddar Stuffed Jalapeno Hush Puppies
Prep Time
10 mins
Cook Time
10 mins
Total Time
20 mins
 

A great snack with some southern influence.  These are excellent finger food for your next party. Just make sure to fry these over low heat so the inside cooks and the cheese melts before the outside burns.

Course: Snack
Cuisine: Southern, Tex-Mex
Servings: 12 pieces
Author: Daniel Peikes
Ingredients
  • 1 Cup Yellow Corn Meal
  • 1/4 Cup All Purpose Flour
  • 1/2 tbsp Baking Powder
  • 1 tsp Salt
  • 1 Jalapeno Seeded and Chopped Finely
  • 1 Large Egg Beaten
  • 3/4 Cup Buttermilk
  • Vegetable Oil For deep frying
  • 8 oz Cheddar Cheese Cut into 1/4" dice
Instructions
  1. Take the cheese out of the fridge to start warming it up.  If it is too cold it will not melt before the hush puppies finish cooking.

  2. Combine the corn meal, flour, baking powder, salt and jalapenos in a large mixing bowl. Mix thoroughly.

  3. In a separate bowl, beat together the egg and buttermilk.

  4. Pour the wet ingredients into the dry, and and stir until the batter just comes together.  It should be the texture of wet sand.  If it looks a bit dry, add some more buttermilk, and if it looks too wet, add some more cornmeal.

  5. Fill a heavy pot or dutch oven 3/4 of the way up the side with vegetable oil and place over low heat. 

  6. Form balls with the using about a tablespoon of batter, placing a cube of cheese in the middle, and fry until golden.

For something sweet (and a little healthy) check out Rachel’s Super Bowl treat: Healthy Superbowl Snack & Almond Butter Snickerdoodle Cookies

Loaded Jicama Fries Two Ways

After Pesach (AKA Passover) everyone is a little sick of potatoes.  Jicama, a large tuber from Mexico with the texture of a turnip and the flavor of an apple is a great substitute for a potato. You don’t get the same crunch as you do with a fried potato, but it is not bad for an occasional change.   Originally I was going to name this  post Jicama Fry Poutine Two Ways, but the recipes moved too far away from a traditional poutine, which is made with cheese curds and gravy.

Mushroom and Cheese Jicama Fries Jicama Fries with Mushroom Gravy and Cheese Sauce

Kosher cheese curds can be very hard to obtain so in my dairy version I substituted a cheese sauce, and the gravy for a mushroom sauce, to keep it all kosher.


5 from 1 vote
Jicama Fries
Prep Time
5 mins
Cook Time
15 mins
Total Time
20 mins
 

This is a great potato alternative if you want to change it up.  You can try baking them instead of frying, but believe me, it won't be nearly as good.

Course: Side Dish
Cuisine: Mexican, vegan
Servings: 4
Author: Daniel Peikes
Ingredients
  • 1 Large Jicima Cut in to 1/2"X1/2" Fries
  • 3 tbsp Seasoned Salt To taste
  • Vegetable Oil For frying
Instructions
  1. Put a large pot of water over high heat and bring to a boil.  Add the fries and boil for 10 minutes to soften them.

  2. Remove the fries from the water and dry them completely.  A salad spinner works well for this.

  3. Add vegetable oil to your largest, heaviest frying pan so it come 3/4" inch up the side.  If you have a cast iron skillet this would be a great time to break it out.  Put over medium heat.

  4. Once the oil gets to 350°F start adding the fries a few at a time being careful not to crowd the pan.  Fry on each side until golden brown.

  5. Move the fries to a cooling rack, season with the seasoned salt, top with your favorite additions, and serve immediately.

5 from 1 vote
Mushroom Gravy
Prep Time
10 mins
Cook Time
20 mins
Total Time
30 mins
 
Course: Sauce
Cuisine: vegan, vegetarian
Ingredients
  • 1 lb Mushrooms (I like cremini AKA baby bellas, but white buttons will work) Stems removed, rinsed, and sliced
  • 2 large Onions Halved
  • 3 tbsp Butter or Olive Oil
  • 3 tbsp All Purpose Flour
  • 3 Cloves Garlic Finely Chopped
  • Additional Olive Oil for Sauteing
  • 1 tbsp Soy Sauce
  • 1 Cup Vegetable Stock Preferably home made, but store bought will be fine
Instructions
  1. Add a couple of tablespoons olive oil to a large saucepan or a dutch over over medium heat.  Add the mushrooms, being careful not crowd the pan. Work in batches if necessary.  Saute the mushrooms until the are nicely browned on both sides and remove them from the pan.

  2. Add the onion and some olive olive oil if needed.  Saute the onions until they take on a golden color.  Add the soy sauce and the garlic and continue to cook until the garlic just starts to brown.  Then remove the onions and garlic from the pan.

  3. Turn the heat down to low and add the flour and butter or olive oil.  Stir constantly to completely coat the flour particles with the fat.  This is called a roux, it is a great thickener for sauces. 

  4. Stir in the mushrooms, garlic, and onions.  Then slowly add vegetable stock, stirring regularly until the desired thickness is achieved.

  5. Serve immediately on top of fries, knishes, pasta, or chicken, the sky is the limit.

5 from 1 vote
Cheese Sauce
Ingredients
  • 3 tbsp Butter or Olive Oil
  • 3 tbsp All Purpose Flour
  • 1/2 Cup Whole Milk Or Cream
  • 1 Cup Shredded Mozzarella
Instructions
  1. Put sauce pan over low heat and add the flour and butter or olive oil. Stir constantly to completely coat the flour particles with the fat. This is called a roux, it is a great thickener for sauces. 

  2. Continue to stir the roux constantly. Once the roux starts to brown add the milk or cream slowly and continue to stir.

  3. Once the milk or cream is completely incorporated, add the cheese and stir the cheese until it is completely melted.  Serve immediately.

Jicama Fries with Shredded Beef and Spicy Salsa Verde

For my meat version, I wanted to something that would stick the ribs, topped off with some heat.  I happened to have had made some Mexican food recently and thought that this was a great opportunity to use up some leftovers.  Pulled beef is a great opportunity to break out the slow cooker (AKA Crock-Pot), and as Ron Popeil always said, set it and forget it. The ingredients for the salsa are grilled, which is a great way to use up the heat from dying coals after a backyard soiree.

5 from 1 vote
Pulled Beef Jicama Fries
Pulled Beef
Ingredients
  • 1 Hunk of Beef Nothing fancy. Neck or shoulder is fine
  • 1 Bottle Beer
  • 29 oz Can of Tomato Sauce
  • 4 Cloves Garlic Roughly chopped
  • 1 Large Onion Sliced
  • 1 tbsp Dried Oregano
  • Salt and Pepper To taste
Instructions
  1. Throw all the ingredients in the slow cooker (AKA Crock-Pot).  Let it cook for about 6 hours on low.  Shred with two forks.  Serve as a taco, with rice, on fries. or over pasta.  Freezes well.

0 from 0 votes
Pulled Beef Jicama Fries
Spicy Tomatillo Salsa Verde
Prep Time
10 mins
Cook Time
15 mins
Total Time
25 mins
 

This is a great condiment when you want to kick it up a notch.  You can add more or less chili peppers to control the level of heat.  You can also remove the ribs and seeds from the peppers to decrease the heat.

Course: Dip
Cuisine: Mexican
Servings: 8
Author: Daniel Peikes
Ingredients
  • 2 Jalapeno Peppers
  • 2 Poblano Peppers
  • 2 Green Bell Peppers
  • 6 Large Tomatillos Husks removed
  • 1 Large Onion Peeled and roughly chopped
  • 3 Cloves Garlic Skin removed
  • Olive Oil
  • 1 Handful Cilantro Chopped
  • 1 Lime
  • Salt and Pepper to Taste
Instructions
  1. Toss all the peppers, tomatillos, onion, and garlic with the olive oil. Put them on the grill or under the broiler until the skin begins to char and then remove from the heat

  2. Remove the tops from the peppers and add them to a large mixing bowl along with the onion, tomatillos, and garlic.  With an immersion (stick) blender, process until desired texture is achieved. This can also be done in a food processor or a regular blender.

  3. Add the cilantro, salt and pepper and the juice from the lime to bowl.  Stir to combine. Serve alongside chips, or on top of tacos or fries.

Don’t forget to check out Rachel’s Jicama recipe here: Spicy Slaw with Quick Pickled Jicama and Creamy Salsa Verde Dressing