

In celebration of Cinco de Mayo this week, I challenged Rachel to make tamales. I decided to go fairly traditional for mine, with just a slight twist on the flavors.
 What are Tamales?
A tamale is a filled corn flour dumpling, usually wrapped in a corn husk (which can be found in most major grocery stores) and steamed, originating from Central and South America. Some cultures use sections of banana leaf instead of the corn husks when making tamales, but they can be hard to find and are very perishable.
This weekend I made a simple roast chicken for dinner Friday night and pulled beef for lunch on Saturday. My kids, like many, complain about eating leftovers. What can I do to reinvent these proteins? Tamales! While tamales are often filled with shredded pork, there is no reason you couldn’t use beef, poultry, fish, or even vegetables for your filling. Included are two filling recipes that make great use of leftover chicken and pulled beef.
I have broken this down to 3 recipes, plus a bonus recipe. The first recipe is for the tamale dough, assembly, and cooking. The other two recipes for the chicken and beef fillings and the bonus recipe is for a jerk seasoning that is used in the chicken filling, but can be used to season a myriad of things. Feel free to play with the filling recipes and adjust them to your liking. These go great with my fermented hot sauce.
Tamale Dough, Construction, And Cooking Instructions

Tamales are a delicious steamed dumpling that hails from Central and South America. It is usually made from a corn flour dough that is wrapped around a filling. The filling is traditionally some sort of meat, but could be vegetables or even fish. Tamales make a great snack, side, or even a small meal, especially when served with some salsa and guacamole. Don't forget the hot sauce and beer to wash it all down.
- 3 1/2 Cups Corn Flour (Masa) Not corn meal, this is much finer
- 4 oz Schmaltz or Vegetable shortening Or lard if you are not kosher
- 1 Tablespoon Kosher Salt
- 1 tbsp Baking Powder
- 4 Cups Stock Chicken, Beef, or Vegetable depending on your filling
- 1 Cup Filling See recipes below
- 24 Dried Corn Husks
- Butchers Twine
- Large Pot With a Steamer Basket
-
Put the corn husks in a large bowl and pour 5 cups of boiling water over the husks. Let soak for an hour.
-
In another bowl add the corn flour, baking powder, and salt and stir to combine thoroughly.
-
Melt the schmaltz/shortening and add it to the stock.
-
Add the stock and fat to the dry ingredients slowly, you may not need all of the liquid mix, and knead until a clay like dough is formed.
-
Place a corn husk in front of you with the wider end facing away from you.
-
Place 2 tablespoons of dough on the husk and press in to a rectangle starting a 1/2" from the top and sides of the husk and should be about 1/2 the length of the husk.
-
Place 2 teaspoons of the filling in the middle of the dough rectangle and form in to a log shape. Avoid getting too close to the any of the sides.
-
Using the husk, form the dough around the filling and and then roll the husk around the filled dough.
-
On the seam side fold the the bottom section of the husk up. and place upside down. Once you have 3 tamales complete tie in to a bundle using the butchers twine, with the seams facing in. Place the bundle in the steamer basket with the open side facing up.
-
Add water to the pot, so it comes just below the steamer basket and bring it to a boil. Turn the heat down to medium and place the steamer basket over the water. Steam covered for about an hour and eat immediately or allow to cool, wrap in plastic, and freeze.
Tamale Fillings
This works great with cheaper cuts of meat like chuck, shank, or brisket. Stay away from something like rib eye. Don't limit yourself to just using this for for tamales. It can be used in kreplach, egg rolls, or just put on a hamburger bun and eaten as a sandwich.
- 1 Cup Shredded Beef Leftover chuck roast, or pot roast work great. You could use brisket but stay away from the pricey cuts like rib roasts.
- 1/2 Cup BBQ Sauce
- 1 Cup Water
- 1 Large Onion Chopped
- 3 Cloves Garlic Chopped
- 1 Bell Pepper Diced
- 2 Tablespoons Olive Oil For sauteing
- 1 Medium Sauce Pan With Lid
-
Add the olive oil to medium sauce pot and place over medium heat. Add the onions and saute until the onions start to brown.
-
Add the garlic and bell pepper to the pot and continue sauteing until the peppers start to soften and the garlic starts to brown.
-
Add the beef, BBQ sauce, and water. Turn down to low, cover, and simmer for about 10 minutes, stirring regularly to prevent burning. Allow to cool before using as filling
This is a great way to use up leftover chicken or turkey. One note, do not use the entire recipe of jerk seasoning. It is strong stuff, two tablespoons should be enough. Don't limit to just using this for for tamales. It can be used in won tons, crepes, or even ravioli.
- 2 Cups Shredded Roast Chicken No need to make fresh. Use leftovers or even store bought rotisserie will work in a pinch
- 1 Cup Chicken Stock
- 1 Large Onion Chopped
- 3 Cloves Garlic Chopped
- 2 Tbsp Jerk Seasoning See recipe below. Store bought can be used in a pinch.
- 2 Tbsp Olive Oil
- 1 Medium sized sauce pot with a lid
-
Add the oil, onions, and garlic to a medium sauce pan and place over medium heat. Saute until the onions start to brown.
-
Add the chicken, stock, and seasoning. Turn down to low, cover, and simmer for about 10 minutes, stirring regularly to prevent burning. Allow to cool before using as filling.
- 1 tbsp Brown Sugar
- 1 tbsp Kosher Salt
- 1 tbsp Garlic Powder
- 1 tbsp Onion Powder
- 1 tbsp Black Peppercorns
- 1 tbsp Juniper Berries
- 1 tbsp Cloves
- 1 tsp Nutmeg
- 1 tbsp Thyme
- 1 tsp Red Pepper Flakes
- 1 tsp Cayenne Pepper
- 1 tsp Cinnamon
- 1 tbsp Smoked Paprika
- Spice or Coffee Grinder
-
Grind the salt, red pepper flake, peppercorns, cloves, and juniper berries, together in an electric spice or coffee grinder and pour in to a bowl. Add all the other ingredients and stir combine.
Don’t forget to check out Rachel’s tamale recipe: Spicy Salmon Tamales

 In honor of

 We are making our own Passover

 I have a confession to make, I am not much of a baker. While I love to cook, I leave most of the baking to my lovely wife Ronit. Not wanting to just rip off someone else’s recipe, this left me with the daunting challenge of coming up with a recipe for

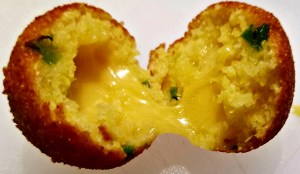
 I was trying to come up with a great bite for the Super Bowl and I toyed with the idea of doing a stuffed pretzel, I was all ready to make pretzels using lye, but decided I needed something a little more approachable. I wanted something quick to make and easy to eat. I rummaged through my fridge and pantry and came up with hush puppies, or fried cornbread balls. There is one thing you do need to be careful about on this, make sure your oil is not too hot. If the oil is too hot, the outside of the hush puppies will burn before the inside cooks and the cheese melts. I know I have been leaning on cheddar and jalapeno lately, but for the Super Bowl it seemed appropriate.

 Straight from the airport we grabbed lunch at
  opinion, large menus are a sign of an unfocused restaurant and the details end up getting lost in the shuffle. The food was decent but a bit forgettable, the service was efficient but waiter seemed like he needed to switch to decaf. We sat inside and to be honest we would have been better outside despite a little bit of heat as the decor was a bit boring and the walls were dingy. Also, we received more than one item on chipped plates, which is a pet peeve of mine.
 For dinner the first night, we headed to Harbour Bistro the sister restaurant to Harbour Grill, in Surfside. The best way I can describe this place is a super high end deli. Don’t think chicken soup and mile high sandwiches, rather think hand crafted sausages and artisan cured meats. The restaurant is a little on the small side and feels a bit cramped, and did have a small issue with a leaky refrigerator, but once I pointed it out the waitress it was quickly cleaned up. Generally the service was excellent and the food was excellent.
 were excellent. You could tell it was homemade and not your average mass produced hot dog. Honestly it ate like a small meal itself.
 I followed that up with the Charcuterie Platter ($34) which a spectacular display of cured meat products. I could not even begin to remember all the varieties presented, but know that it changes daily based on availability. The assortment ranged from super rich to downright funky, but I enjoyed it. I would recommend splitting this dish with at least one other person as it is a lot of food and can be a little overwhelming.
 eye dry aged for 6 weeks and pan seared. It is served with sauteed potatoes and seasonal vegetables. She seemed to enjoy it and the bite I had was tasty.
 sert we shared what they called an Opera ($15). It seamed to be some sort of hybrid of a napoleon and tiramisu. It was fairly enjoyable and well presented.
 For brunch the second day we went to Grand Cafe in Hollywood. Of the three restaurants we caught lunch at, all Israeli style dairy cafes, this was the best. This time we sat
  outside and enjoyed the 80 degree weather, although the ambiance suffers slightly due to the fact it is a strip mall and occasionally you catch a whiff of cigarettes from the smoking section. Even though they were fairly busy for a late morning in the middle of the week, the service
  was very attentive, although we were cared for by multiple servers which was a bit confusing. We started with a warmed chocolate croissant ($4) and a potato boreka ($2) which were generally good. My wife had a the croissant special ($10.45), which is a croissant omelet sandwich with cheese and tomato. She thought is was excellent even though she does not usually like tomatoes. I had the Belgium waffles ($12) and a cafe mocha ($4.45), both were good but nothing to write home about. Overall a good meal.

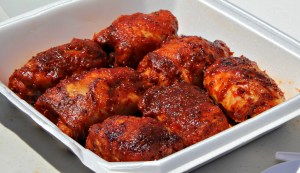
 First thing I want to say is while they Backyard BBQ is open late like many restaurants in South Florida, get there early because the good stuff sells out fast. We got there around 8 PM and all forms of beef ribs were done for the day. The menu was printed on a simple piece of paper in a plastic sheet protector, which I will chalk up to the fact that they recently reopened with a new menu. They have a couple of televisions which I find distracting, but according to Mendel the restaurant gets a sizable crowd for football games. The service was excellent, the waiter was very attentive. The best way I could describe the decor was elegantly rustic, which I enjoyed.
 hich was somewhat
 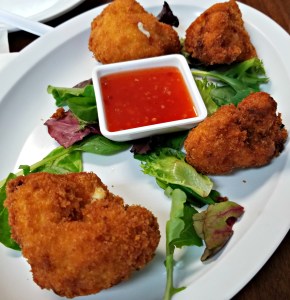 unimpressive. Similar to when we we went to Mozart Cafe we started with cauliflower tempura ($9), described as battered deep-fried cauliflower served with chili sauce. The dish was very similar to Mozart’s. Yumberry’s cauliflower also seemed to be breaded and not battered and the sweet chili sauced seemed like the same bottled sauce as Mozart.

 Later that day we grabbed a quick early early dinner at Foozo. The food did take a bit of time but was generally pretty good. The pizza topping options were creative and the sauce and crust overall pretty good, although it could have been just a tad thicker as it got a bit soggy. The fries were a bit of let down though, as they seemed to be a mass produced frozen product.
 We stopped at Serendipity in Wynwood for some ice cream before leaving but they were closed to do a pop-up event offsite. So we walked up the street and grabbed some pastries from the popular Zak the Baker. One of these days I will get to his new restaurant, as we had been to their old location a few years ago, and their stuff is the real deal, laden with rich butter and flaky puff pastry.
 Who doesn’t love latkes, but definitely don’t serve these with apple sauce as they definitely are not your bubbie’s. After eating what feels like nothing but carbs for a few days, I wanted something a little lighter. Enter cauliflower. And yes, I know I am encroaching on Rachel’s territory, but I think I have done a good job of putting my own spin on it.


 This pizza is one of my wife’s favorites. It does take a little bit of time to made the roasted garlic and caramelized onions, but that can be done ahead of time. Roasted garlic and caramelized onions have a million uses. I love roasted garlic baked in to a crusty homemade loaf of bread, and caramelized onions make a great topping for hot dogs and hamburgers.

 Before we get to the fried pickles I want to say congratulations to Anita Jude of Ashland, KY. She is the lucky winner of our
You must be logged in to post a comment.