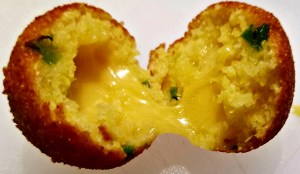
I was trying to come up with a great bite for the Super Bowl and I toyed with the idea of doing a stuffed pretzel, I was all ready to make pretzels using lye, but decided I needed something a little more approachable. I wanted something quick to make and easy to eat. I rummaged through my fridge and pantry and came up with hush puppies, or fried cornbread balls. There is one thing you do need to be careful about on this, make sure your oil is not too hot. If the oil is too hot, the outside of the hush puppies will burn before the inside cooks and the cheese melts. I know I have been leaning on cheddar and jalapeno lately, but for the Super Bowl it seemed appropriate.
A great snack with some southern influence. These are excellent finger food for your next party. Just make sure to fry these over low heat so the inside cooks and the cheese melts before the outside burns.
Course:
Snack
Cuisine:
Southern, Tex-Mex
Servings: 12pieces
Author: Daniel Peikes
Ingredients
1CupYellow Corn Meal
1/4CupAll Purpose Flour
1/2tbspBaking Powder
1tspSalt
1JalapenoSeeded and Chopped Finely
1LargeEggBeaten
3/4CupButtermilk
Vegetable OilFor deep frying
8ozCheddar CheeseCut into 1/4" dice
Instructions
Take the cheese out of the fridge to start warming it up. If it is too cold it will not melt before the hush puppies finish cooking.
Combine the corn meal, flour, baking powder, salt and jalapenos in a large mixing bowl. Mix thoroughly.
In a separate bowl, beat together the egg and buttermilk.
Pour the wet ingredients into the dry, and and stir until the batter just comes together. It should be the texture of wet sand. If it looks a bit dry, add some more buttermilk, and if it looks too wet, add some more cornmeal.
Fill a heavy pot or dutch oven 3/4 of the way up the side with vegetable oil and place over low heat.
Form balls with the using about a tablespoon of batter, placing a cube of cheese in the middle, and fry until golden.
A few weeks ago my wife and I headed down to South Florida for some restaurant hopping and relaxation. Here is a review of the kosher restaurants we tried while we were down there.
Straight from the airport we grabbed lunch at Mozart Cafe in Hollywood. The first thing I noticed was the menu was absolutely massive for a cafe. Of course there was sushi on the menu, because it wouldn’t be a kosher joint without it. In my opinion, large menus are a sign of an unfocused restaurant and the details end up getting lost in the shuffle. The food was decent but a bit forgettable, the service was efficient but waiter seemed like he needed to switch to decaf. We sat inside and to be honest we would have been better outside despite a little bit of heat as the decor was a bit boring and the walls were dingy. Also, we received more than one item on chipped plates, which is a pet peeve of mine.
Chipped Plate
We started with breaded tempura cauliflower served with a sweet chili sauce to share. It was definitely breaded and not tempura. I am not sure why they used the term tempura in the description. The portion size was sufficient, which is the least I would expect for $9 appetizer and the sauce tasted like it was out of a bottle.
My wife ordered gnocchi with a garlic alfredo sauce ($17.45). The gnocchi tasted mass produced and were way over sauced. I ordered their Milano pizza ($11.50) which was what I think of as a Margarita (fresh mozzarella, basil, and tomato) with the addition of shredded mozzarella and tomato sauce. Overall the pizza was fine, but I suspect the crust may have been mass produced. An 18% tip was automatically added. Overall it was sufficient for a quick lunch but not particularly impressive and a bit over-priced.
For dinner the first night, we headed to Harbour Bistro the sister restaurant to Harbour Grill, in Surfside. The best way I can describe this place is a super high end deli. Don’t think chicken soup and mile high sandwiches, rather think hand crafted sausages and artisan cured meats. The restaurant is a little on the small side and feels a bit cramped, and did have a small issue with a leaky refrigerator, but once I pointed it out the waitress it was quickly cleaned up. Generally the service was excellent and the food was excellent.
My wife started with the Short Rib Flat Bread ($26) with caramelized onions, and sautéed mushrooms which she thoroughly enjoyed. I tasted it and found it very good. The bread was a little thicker than I expected. My guess is that was done intentionally to handle the volume and moisture of the toppings.
I started with the homemade Sausage Platter, ($24) an assortment of 2 merguez and 2 lamb chorizo. The flavor and texture were excellent. You could tell it was homemade and not your average mass produced hot dog. Honestly it ate like a small meal itself.
I followed that up with the Charcuterie Platter ($34) which a spectacular display of cured meat products. I could not even begin to remember all the varieties presented, but know that it changes daily based on availability. The assortment ranged from super rich to downright funky, but I enjoyed it. I would recommend splitting this dish with at least one other person as it is a lot of food and can be a little overwhelming.
My wife order the Rib Eye ($52) described on the menu as a certified prime rib eye dry aged for 6 weeks and pan seared. It is served with sauteed potatoes and seasonal vegetables. She seemed to enjoy it and the bite I had was tasty.
For dessert we shared what they called an Opera ($15). It seamed to be some sort of hybrid of a napoleon and tiramisu. It was fairly enjoyable and well presented.
While the wine list was large enough for me, I found the number of wines available by the glass a little low, most were only available by the bottle.
Overall the food was excellent both in taste and presentation and the service was excellent. However, the ambiance was slightly lacking, detracted by the open deli counter and the noise of the slicer and vacuum sealer.
For brunch the second day we went to Grand Cafe in Hollywood. Of the three restaurants we caught lunch at, all Israeli style dairy cafes, this was the best. This time we sat outside and enjoyed the 80 degree weather, although the ambiance suffers slightly due to the fact it is a strip mall and occasionally you catch a whiff of cigarettes from the smoking section. Even though they were fairly busy for a late morning in the middle of the week, the service was very attentive, although we were cared for by multiple servers which was a bit confusing. We started with a warmed chocolate croissant ($4) and a potato boreka ($2) which were generally good. My wife had a the croissant special ($10.45), which is a croissant omelet sandwich with cheese and tomato. She thought is was excellent even though she does not usually like tomatoes. I had the Belgium waffles ($12) and a cafe mocha ($4.45), both were good but nothing to write home about. Overall a good meal.
For dinner the second night we headed back to Surfside to Backyard BBQ and Brew. Before I go ahead with my review, as a matter of full disclosure I want to admit a bias. I consider Mendel Segal, the Pit Master at Backyard BBQ a friend. I have competed both against him and in BBQ competitions that he has organized. That being said I will do my best to be objective.
First thing I want to say is while they Backyard BBQ is open late like many restaurants in South Florida, get there early because the good stuff sells out fast. We got there around 8 PM and all forms of beef ribs were done for the day. The menu was printed on a simple piece of paper in a plastic sheet protector, which I will chalk up to the fact that they recently reopened with a new menu. They have a couple of televisions which I find distracting, but according to Mendel the restaurant gets a sizable crowd for football games. The service was excellent, the waiter was very attentive. The best way I could describe the decor was elegantly rustic, which I enjoyed.
We started with the Brisket Truffle Poutine Fries ($18). The fries looked fresh and hand cut in house. The gravy was nice and rich, and the brisket shreds were moist, although I don’t know that I got much truffle from the dish, but overall a good dish. On the menu it says, “Ask about our combo platters,” so I asked Mendel to make me a platter of whatever he thought was good that night. I ended up with a combo including a 2/3 of an order of brisket ($20), a full order of burnt ends ($25), and a 1/2 order of lamb ribs ($21) along with sides of red skin mashed potatoes and green beans. The brisket and burnt ends were excellent as I have come to expect from Mendel as the winningest man in kosher BBQ. Although, as far as the lamb ribs were concerned I found the crust from the rub and the fat both to be a bit thick relative to the amount of meat on them, which I attribute more to the anatomy of the animal than the cook, and for what they cost I would not order them again.
They have a great craft beer list. I was looking for something on the lighter side, so I ordered a Shiner Ruby Redbird, a grapefruit flavored beer. While I found it refreshing I did not get much grapefruit flavor from it. Mendel also brought me over another beer on the house, a stout that someone had brought him that I found excellent. We ended the meal with the bourbon pecan pie which I highly recommend. Like I said at the beginning, I am biased, but if you are in the mood for some real deal kosher BBQ, this place is not to be missed.
On day 3 we had brunch at Yumberry in Hollywood which was somewhat unimpressive. Similar to when we we went to Mozart Cafe we started with cauliflower tempura ($9), described as battered deep-fried cauliflower served with chili sauce. The dish was very similar to Mozart’s. Yumberry’s cauliflower also seemed to be breaded and not battered and the sweet chili sauced seemed like the same bottled sauce as Mozart.
My wife had a tuna panini ($13) which see said was decent, although not particularly remarkable. I had a shakshuka ($12). The eggs in that shakshuka were cooked over easy and then added to the sauce (which I found a bit thin), despite my specific request to have the eggs cooked in the sauce. I also had the Yum Berry coffee, a mocha cappuccino with whipped cream. It seemed a bit small, and lacked some oomph. Overall the meal was unimpressive.
Later that day we grabbed a quick early early dinner at Foozo. The food did take a bit of time but was generally pretty good. The pizza topping options were creative and the sauce and crust overall pretty good, although it could have been just a tad thicker as it got a bit soggy. The fries were a bit of let down though, as they seemed to be a mass produced frozen product.
We stopped at Serendipity in Wynwood for some ice cream before leaving but they were closed to do a pop-up event offsite. So we walked up the street and grabbed some pastries from the popular Zak the Baker. One of these days I will get to his new restaurant, as we had been to their old location a few years ago, and their stuff is the real deal, laden with rich butter and flaky puff pastry.
All in all it was nice to visit some restaurants that we don’t have in Chicago and of course the weather was definitely better than back home.
Who doesn’t love latkes, but definitely don’t serve these with apple sauce as they definitely are not your bubbie’s. After eating what feels like nothing but carbs for a few days, I wanted something a little lighter. Enter cauliflower. And yes, I know I am encroaching on Rachel’s territory, but I think I have done a good job of putting my own spin on it.
Raw cauliflower can have a sulfuric or bitter flavor, but by roasting it first you can bring out its nuttiness and sweetness. The cheese adds some richness to balance the earthy flavors of the cauliflower as well as acting as a binder. The jalapeno adds some heat to sharpen all the otherwise tame flavors of the latke.
This is not your bubbie's latke. The use of cauliflower lightens up the recipe, while the cheese and jalapeno add richness and sharpness to the otherwise simple flavor. I recommend making them on the thinner side so they cook through without burning on the outside.
Course:
Main Course, Side Dish, Snack
Cuisine:
Jewish, Tex-Mex
Author: Daniel Peikes
Ingredients
1Large HeadCauliflowerCore removed and broken up into florets
1LargeOnionPeeled and quartered
2tbspOlive Oil
1CupCheddar CheeseShredded
4LargeEggsBeaten
3LargeJalapenosChopped, remove seeds and ribs to lessen the heat
1CupAll Purpose Flour
Salt and PepperTo taste
Vegetable OilFor frying
Special Equipment
Food ProcessorFitted with a chopping blade
Parchment Paper
Instructions
Preheat your oven to 400°F. Toss the cauliflower and onion with the olive oil and place on parchment paper lined sheet pan. Roast until the cauliflower starts to brown.
Add the cauliflower and onion to the food processor and process until smooth but not liquid.
Move mixture to a large mixing bowl and incorporate mix in the flour, cheese, eggs, jalapeno, salt, and pepper, stirring until all the ingredients are evenly distributed.
Add about a 1/2 inch of oil in a large frying pan or skillet, and place over medium heat.
Form patties of your desired size and fry on each side until golden brown.
This recipe blends tradition with something a little more modern. The salsa can be used on its own or mixed with sour cream to cool off the heat in the latkes. You can also swap the bell peppers for jalapenos if you want to heat things up.
Course:
Sauce
Cuisine:
Kosher, Mexican, Tex-Mex
Author: Daniel Peikes
Ingredients
1LargeGreen Bell Pepper (or 4 Jalapenos if you prefer it spicy)Stem and seeds removed, roughly chopped
4BunchesScallionsRoot ends removed
6MediumTomatillosHusks removed and halved
3ClovesGarlic
1BunchCilantroStems removed
Juice of 1 lime
Salt and PepperTo taste
8ozSour Cream
Special Equipment
Food Processor Fitted with a chopping blade
Parchment Paper
Instructions
Preheat your oven to 400°F. Spread out the peppers, scallions, tomatillos, and garlic on a parchment lined sheet pan and roast until they start to char.
Add the peppers, scallions, tomatillos, garlic, cilantro, and lime juice to the food processor. Process to desired texture. Season with salt and pepper to taste.
You can serve the salsa as is or combine a half cup of the salsa with the sour cream for a richer topping. If you are going to mix the salsa with the sour cream I recommend processing the salsa until smooth.
I have been meaning to get this post out for a while, but it was a pretty crazy summer and life got in the way. Back on June 25th, 2017, Rachel and I competed in the 2nd Annual St. Louis Kosher BBQ competition hosted by Nusach Hari B’nai Zion (NHBZ) under the banner of our kosher BBQ team “5 Dudes and a Vegetarian”. It was a whirlwind trip that included kosher BBQ, Indian food, and doughnuts. Rachel’s husband Elliott picked me and Rachel up from her office Thursday afternoon and of course it began to rain just as we were leaving. Lucky for us, the rain didn’t last long. We hit a little traffic leaving Chicago but still made decent time, getting to St. Louis at about 9:30PM and crashed for the night.
The next morning, after some coffee and Krispy Kreme doughnuts provided by our awesome BBQ teammate, Debbie Burg, we got down to work prepping for the competition at NHBZ. The competition was sanctioned by the Kansas city BBQ Society (KCBS). Their are several organizations that certify BBQ conceptions but the KCBS is probably the largest. They started sanctioning kosher competitions about five years ago and about 2 years ago released an official set rules for kosher BBQ competitions. In kosher BBQ competitions there are generally four categories:
Chicken
Turkey
Beef Ribs
Brisket
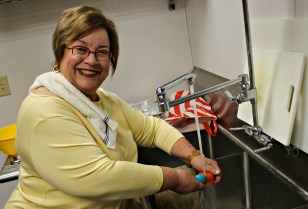
There was trimming of meats, mixing of rubs, simmering of sauces, and one or two spills, but it was all good fun. We prepped pretty much everything except the chicken, which we left up to Debbie to do Saturday night. Rachel’s Aunt Sue (pictured below) joined us for the prep and was stuck with the unenviable task of doing the dishes.
After we finished prep we headed to Schnucks, a local grocery with a decent kosher selection, although it pales in comparison to Chicago’s Jewel-Osco. I was particularly discouraged to find out all their cakes were dairy, as it was Debbie’s birthday and we hoping to bring a pareve (non-dairy) cake to the competition. As the competition was obviously fleshig (meat), the rules as well as biblical kosher requirements forbid (among other things) the mixing of milk and meat. We picked up some snacks, beer, and last minute supplies for the competition.
Then it was time for lunch at Gokul Indian restaurant. Definitely go for the buffet if they are offering it when you visit. I way over ordered, as I almost never get to eat Indian. Unfortunately, my family members aren’t as culinarily adventurous as I am, and there are no kosher Indian joints in Chicago. I ordered the combo appetizer plate of Miorchi Bhajia, Samosa, Bataka Vada, and Vegetable Pakora to split with Elliott, but ended eating most of it myself, followed by the buffet where I had a little bit of everything on the menu, and side of puffy flat bread known as Puri and washed it all down with a mango lassi. Needless to say, I was stuffed.
I then spend a relaxing Shabbat (sabbath) with the Freund family who were very gracious hosts, proving me with excellent food, company, and some much needed rest ahead of long night of cooking and drinking. As a bonus, they invited a long time friend of mine, Judy Haber, for lunch.
Right after Shabbat we headed to the competition grounds and to set up. We needed to build our own tent which was a surprise to me as this was has always been something that was done by organizers in my previous experiences. When you get to a competition, any extra work can throw you off your game when all you want to do is get set up, and start cooking (and drinking). Lucky our final teammate, Rob Feiger, got there ahead of us and had already put up the tent.
There were a few familiar faces there, including David Horesh and his family who make up team SephardiQ and Mordechai Stricks of team Uncle Mordy and Meatzvah Girls. A few other teams showed up late, that had not done any prep earlier. These teams needed to choose their meat, which in a kosher competition is provided by the organizers, but they were a little short on ribs. At one point, the organizers came around to reclaim one of three racks of ribs they had issued to the teams to redistribute them to the other teams that were shorted.
In order to keep things kosher, most of the kosher competitions supply all needed ingredients and equipment. This event did provide a grill and a smoker as well as a basic set of culinary tools. I have to be honest though, the knives were fairly dull and the ingredient pantry was basically non-existent. I did reach out the organizers ahead of time and learned that it would be slim pickings for supplies so I brought most of what I needed with me from Chicago.
Mendel Segel
Sometime in the early morning hours the wind picked up. This makes tending the fire a bit tricky, but we managed to keep our temperature fairly stable. The real problem was the fact that tents, which are essentially giant sails, were fairly light weight and were not sufficiently staked down, and started to fly away. After the tents to left and the right of me blew over, I got smart and tied mine down to our two tables, which managed to hold it for the remainder of the event.
Rachel and Her Mother
The spectators showed up around 11:00 AM. The competition sold tasting tickets so the spectators could get a “taste” of the action. I had a fewfriends stop including my co-worker Brian Kinney who was in town visiting his father, my grade school friend Nathan Waldman who moved to St. Louis for college and never left, and Judy Haber’s daughter Aliza, who at one point was Rachel’s roommate. Rachel’s parents also came down, making the drive from Kansas City and bringing bagels.
To be honest all of our food came out mediocre and our scores reflected it. Our ribs were overcooked, the turkey wasn’t the prettiest, and brisket was a bit tough. I have tendency to rush and end up slicing my meat a little too early. We ended up placing fifth overall. All four teams that beat us were more experienced than us, and deserved to beat us. Of course team RaBBi-Q took top honors. Only Mendel Segal could roll in late having done no prep and take overall grand champion. Despite a few bumps, all in all it was a great time.
This pizza is one of my wife’s favorites. It does take a little bit of time to made the roasted garlic and caramelized onions, but that can be done ahead of time. Roasted garlic and caramelized onions have a million uses. I love roasted garlic baked in to a crusty homemade loaf of bread, and caramelized onions make a great topping for hot dogs and hamburgers.
This pizza is a great way to add an adult twist to a meal that is often thought of as something for the kids. You can use the same recipe for the crust and sauce and substitute for other vegetable (or leave them off all together) for the kiddos.
I have to admit this recipe came from my mother-in-law, although I don't know where she got it from originally. I like it primarily because it is easy and fast.
Course:
Main Course
Cuisine:
Italian
Servings: 3Large Pizzas
Ingredients
5CupsFlour
1/4CupOlive Oil
3EnvelopesDry Yeast
2CupsWater
2tbspKosher Salt
Instructions
Add all ingredients in the bowl of a stand mixer and mix on low until all the ingredients are thoroughly combined and dough ball is formed.
Increase the speed of the mixer to medium. Let the dough knead until it can be stretched thin enough to you can see light through it without tearing it.
Put the dough in a greased bowl and cover with a towel. Allow to rise until the dough doubles in size.
Preheat your oven to 500°F. If you have a pizza stone place it in the oven before you the oven is hot.
Take a dough ball and roll it in to a thin to the size you desire and place on a pizza screen or pan. Spread on sauce, cheese, and toppings and bake until the crust is golden.
Before we get to the fried pickles I want to say congratulations to Anita Jude of Ashland, KY. She is the lucky winner of our reCAP Mason Jar Kit Giveaway. Thanks to folks at reCap Mason Jars for providing the prize. Anita let us know how you plan on using the fermentation kit. I love a good pickle.
While we are on the topic of pickles, I had some pickle chips sitting in the fridge from my Very BBQ Purim, and some matzo meal left over form Passover and I figured why not give fried pickles a try and I was pleasantly surprised. I paired it with a spicy mayo made with my Green Fermented Hot Sauce, for a great crispy snack. It also makes a great addition to your new cook out, as an appetizer for you next casual dinner party, or a great hors d’oeuvre at a cocktail hour. It is also vegetarian friendly, and for gluten free version you can substitute the matzo meal for corn meal.
Lightly dust the pickle chips with flour with flour, making sure to shake off any excess.
Dip the pickle chips in the beaten egg.
Coat the pickle chips in the matzo meal.
Add about an inch of oil to heavy frying pan and put over medium heat. If you have a cast iron skillet this is a good time to use it. Fry on each side until golden brown.
Mix the hot sauce with the mayo and drizzle over the fried pickles. Serve immediately.
A few months back Rachel and I attended the 2017 International Home + Housewares Show. This was the second year we went, and the second year that the fine folks at reCap Mason Jars have taken time to talk to us and show us their products. They followed up with us after the show and sent us one of their super fun Fermentation Starter Kits to review and another one to give away. Fermentation in a mason jar is a great way to preserve vegetables, while giving them great flavor. If our recipe below we take it to the next level and make a bright hot sauce. Details on the giveaway are at the end of the post.
As far as the kit is concerned, it is pretty straight forward.
It comes with the following:
1-24 ounce Ball Mason jar
1-Pour lid
1-reCAP Fermenter (A waterless airlock)
1-4 ounce Ball Mason jar
1-2.5 ounce packet Himalayan Pink Salt
An instructional guide including 3 recipes
The products included all look to be of solid quality. The two mason jars included are made by Ball, which makes a quality product. the pour lid seems to be made of quality plastic and forms a good seal. The pour lid can be used for other things like salad dressings and cocktails. The airlock fermenter seem to be of good quality, but check back in two weeks when we find out how the fermented hot sauce comes out (recipe below). The pink salt is a nice touch, but really any salt would have worked. I usually use Morton Canning and pickling salt. The instructions and guide could have been a bit more detailed. I did not like the fact that they put all the measurements in volumetric measurements instead of weights. This can throw you off it you use a different size grind on your salt such as kosher salt which is much larger, or pickling salt which is much finer.
A while ago we did an un-boxing video on Facebook Live, check it out here:
What is Fermentation?
A quick primer of fermentation. Fermentation is a process where something, usually a vegetable, is preserved by exposing it to specific beneficial bacteria, yeasts, or other microorganisms. They keep other, nasty, bugs away and create a pleasant tangy flavor. This is accomplished by submerging the vegetable in a salt water brine, which keeps the harmful bugs away while beneficial ones thrive. Other herbs and spices can be added to the brine for additional flavor. The process creates carbon dioxide, this is where the airlock comes in. The airlock allows the carbon dioxide out without letting other contaminants in, so the glass jar does not explode.
I took one of the recipes that came with the Fermentation Starter Kit and put a twist on it. Below is my version of the recipe. The sauce takes two weeks to ferment, so stay tuned to see how it comes out.
This is a recipe based on the hot sauce recipe included in the Fermentation Starter Kit by reCAP. The kit includes all of the equipment you need. The original recipe is for a red hot sauce, but I had a bunch of green peppers to use up so I went off script. I also added lime juice and scallions that are not in the original recipe to put my own spin on it.
This recipe only takes about 10 minutes to prepare, but then takes 2 weeks to ferment so plan ahead. It goes great on tacos, pizza, chicken, or anywhere you want to add a little heat.
Course:
Sauce
Cuisine:
Tex-Mex
Servings: 1Jar
Author: Daniel Peikes
Ingredients
1Green Bell PepperSliced thin
2Jalapenos PeppersSliced into rounds
2Serrano PepperSliced into rounds
2ClovesGarlicSliced thin
2ScallionsSliced thin
1.5CupsFiltered Water
1tspSalt
Juice of One Lime
Instructions
Combine the salt, water, and lime juice to create a brine. Stir until the salt is dissolved.
Add all the peppers, garlic, and scallions to a mason jar, then pour the brine on top, leaving a few inches of space at the top.
Add a weight to keep the peppers below the water line. A smaller mason jar works well for this.
Let the vegetables ferment for 14 days, then remove from the brine but don't throw out it out.
Blend the vegetables slowly, adding the brine back in until the desired constancy is achieved. Store in the refrigerator and it should last for a very, very long time. (or maybe not, if you use it quickly!)
Now on to the giveaway. The fine people at reCap MAson Jars, will give on lucky reader of our blog a free fermentation starter kit. You can earn entries into the giveaway by using the Rafflecopter links below and completing the following tasks:
Subscribe to the blog via the box on the top right of screen
The giveaway will run for 2 weeks, which is coincidentally the same amount of time it take for the hot sauce in the recipe to ferment. Tune back in then and we will do a taste test to see how the hot sauce came out, and announce the winner of the giveaway. Good luck everyone and thanks for your support.
This post contains affiliate links, which means I receive compensation if you make a purchase using those links. The products being reviewed and given away were provided free of charge by reCap Mason Jars.
When it comes to Passover (AKA Pesach), most families have more traditions than Fiddler on the Roof. I was all set to make you a super traditional matzo ball with homemade chicken schmaltz and gribenes. I figured this was going to be an easy challenge to beat Rachel at. How could a vegetarian gluten free dish beat (to quote Walter from The Big Lebowski) “…three thousand years of beautiful tradition, from Moses to Sandy Koufax”. So I spent hours slowly rendering chicken skin to extract some liquid gold and produce crispy little chicken skin cracklings, and then…and then one of my kids spilled my schmaltz. All over the kitchen floor. Needless to say, I was not happy.
That is when I went in to problem solving mode. What do I have in the house that is similar to schmaltz? That is where I completely broke with tradition and went to one of my favorite crutches, (kosher) bacon. Ask your Bubby, there ain’t nothing traditional about bacon. That being said, it does provide fat and crunch just like schmaltz and gribenes.
Let me know what you think of the recipe in the comments. Also, let me know if you like my matzo ball soup or Rachel’s better. You can find hers here: Minestrone Soup with Gluten-Free Matzah Balls
A classic kosher comfort dish. It's good for what ails you, they don't call it Jewish penicillin for nothing. I don't like anything too fancy in my chicken soup so I stay away from things like zucchini and tomatoes, but if you like them feel free to add them, it won't hurt anything.
One final note, your soup will never taste as good as your mother's for 2 reasons:
1. Memories are a strong force
2. She probably added some soup mix with MSG to give it that little something extra.
Course:
Soup
Cuisine:
Jewish
Servings: 1Large Pot
Author: Daniel Peikes
Ingredients
4MediumCarrotsPeeled and cut into 1 inch rounds
4RibsCeleryRinsed, tops and bottoms cut off and cut into 1 inch pieces
1LargeSweet PotatoPeeled and cut into chunks
1TurnipPeeled and cut into chunks
1ParsnipPeeled and cut into 1 inch rounds
1OnionPeeled and roughly chopped
SaltTo taste
PepperTo taste
1HandfulDill
1HandfulParsley
3Bay Leaves
4Chicken Leg QuartersRemove and save the fat and skin to make schmaltz
Instructions
Put all the ingredients in your largest pot and fill with enough water to cover everything, making sure not to fill too high in order to prevent it from boiling over.
Cover the pot and put over high heat and bring to a boil. Once the soup is at a boil remove the lid and turn the heat down to a simmer.
Let the soup simmer for about four hours or until the soup reduces by about 15%.
Remove chicken from the bones, adding the chicken back in to the soup and discarding the bones. Serve within a week or freeze for up to six months.
2tbspFat(Kosher) Bacon grease, chicken schmaltz, or vegetable oil
1LargeEggBeaten
2tbsp(Kosher) Bacon or GribenesChopped very fine
2quartsChicken StockFor cooking the Matzo Balls
Instructions
Add all ingredients except the 2 quarts of chicken stock in a large mixing bowl, stir with a large wooden spoon, ideally one passed down from your Bubby, until all ingredients are thoroughly combined. Put the mixture in the fridge for about an hour to hydrate.
Roll out the matzo balls just slightly smaller than a golf ball and cook in chicken stock for about 5 minutes. Serve immediately or remove from liquid and freeze.
In honor of the upcoming Jewish holiday of Purim I challenged Rachel to hamantaschen throw down. I figure I should be able to best her easily, as they are usually high in sugar and carbs which are Kryptonite to my compadre.
While hamantaschen usually take the form of a sweet triangular cookie, I went in a completely different direction creating a savory appetizer version. For the BBQ sauce I recommend my Dr. Pepper BBQ Sauce .
A great a savory twist on a traditionally sweet cookie. It makes a great appetizer.
Course:
Appetizer, Side Dish
Cuisine:
Asian, BBQ
Servings: 4
Author: Daniel Peikes
Ingredients
12Round Won-ton skinsThawed
1/2Chicken Chopped (Roasted, Grilled, or SmokedStore bought rotisserie or leftover chick works great for this
2CupsBBQ Sauce
1WholeEggBeaten
Vegetable Oil for Frying
Instructions
Add the chicken and BBQ sauce to a pot and simmer over medium heat for about 10 minutes.
Add a teaspoon of the chicken to the center of the won-ton skin, brush egg on the edges, and fold the edges to make a triangle with an open center. Repeat for all 12 won-tons.
Fill a heavy frying pan with about a 1/2" of oil and place over medium heat. Fry over until golden brown on each side and serve immediately.
Please let me know what you think of the recipe in the comments. Also let me know if you liked my hamantaschen recipe or Rachel’s better. Her’s can be found here: Not one, but TWO healthy Hamantaschen!
This is a great all purpose sauce that takes advantage of that special something you get from the 23 secret flavors that are combined to make Dr. Pepper. If you don’t want to take the time to reduce Dr. Pepper to syrup you can use Soda Stream’s Dr. Peter Sparkling Drink Mix.
I love this on chicken and often use it balance out spicy rubs on wings. It also makes a great condiment for burgers. Please let me know how you like it in the comments.


 I was trying to come up with a great bite for the Super Bowl and I toyed with the idea of doing a stuffed pretzel, I was all ready to make pretzels using lye, but decided I needed something a little more approachable. I wanted something quick to make and easy to eat. I rummaged through my fridge and pantry and came up with hush puppies, or fried cornbread balls. There is one thing you do need to be careful about on this, make sure your oil is not too hot. If the oil is too hot, the outside of the hush puppies will burn before the inside cooks and the cheese melts. I know I have been leaning on cheddar and jalapeno lately, but for the Super Bowl it seemed appropriate.

 Straight from the airport we grabbed lunch at
  opinion, large menus are a sign of an unfocused restaurant and the details end up getting lost in the shuffle. The food was decent but a bit forgettable, the service was efficient but waiter seemed like he needed to switch to decaf. We sat inside and to be honest we would have been better outside despite a little bit of heat as the decor was a bit boring and the walls were dingy. Also, we received more than one item on chipped plates, which is a pet peeve of mine.
 For dinner the first night, we headed to Harbour Bistro the sister restaurant to Harbour Grill, in Surfside. The best way I can describe this place is a super high end deli. Don’t think chicken soup and mile high sandwiches, rather think hand crafted sausages and artisan cured meats. The restaurant is a little on the small side and feels a bit cramped, and did have a small issue with a leaky refrigerator, but once I pointed it out the waitress it was quickly cleaned up. Generally the service was excellent and the food was excellent.
 were excellent. You could tell it was homemade and not your average mass produced hot dog. Honestly it ate like a small meal itself.
 I followed that up with the Charcuterie Platter ($34) which a spectacular display of cured meat products. I could not even begin to remember all the varieties presented, but know that it changes daily based on availability. The assortment ranged from super rich to downright funky, but I enjoyed it. I would recommend splitting this dish with at least one other person as it is a lot of food and can be a little overwhelming.
 eye dry aged for 6 weeks and pan seared. It is served with sauteed potatoes and seasonal vegetables. She seemed to enjoy it and the bite I had was tasty.
 sert we shared what they called an Opera ($15). It seamed to be some sort of hybrid of a napoleon and tiramisu. It was fairly enjoyable and well presented.
 For brunch the second day we went to Grand Cafe in Hollywood. Of the three restaurants we caught lunch at, all Israeli style dairy cafes, this was the best. This time we sat
  outside and enjoyed the 80 degree weather, although the ambiance suffers slightly due to the fact it is a strip mall and occasionally you catch a whiff of cigarettes from the smoking section. Even though they were fairly busy for a late morning in the middle of the week, the service
  was very attentive, although we were cared for by multiple servers which was a bit confusing. We started with a warmed chocolate croissant ($4) and a potato boreka ($2) which were generally good. My wife had a the croissant special ($10.45), which is a croissant omelet sandwich with cheese and tomato. She thought is was excellent even though she does not usually like tomatoes. I had the Belgium waffles ($12) and a cafe mocha ($4.45), both were good but nothing to write home about. Overall a good meal.

 First thing I want to say is while they Backyard BBQ is open late like many restaurants in South Florida, get there early because the good stuff sells out fast. We got there around 8 PM and all forms of beef ribs were done for the day. The menu was printed on a simple piece of paper in a plastic sheet protector, which I will chalk up to the fact that they recently reopened with a new menu. They have a couple of televisions which I find distracting, but according to Mendel the restaurant gets a sizable crowd for football games. The service was excellent, the waiter was very attentive. The best way I could describe the decor was elegantly rustic, which I enjoyed.
 hich was somewhat
 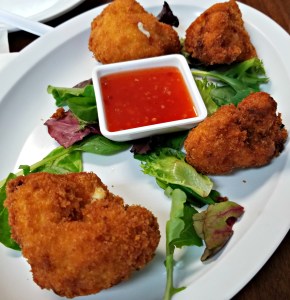 unimpressive. Similar to when we we went to Mozart Cafe we started with cauliflower tempura ($9), described as battered deep-fried cauliflower served with chili sauce. The dish was very similar to Mozart’s. Yumberry’s cauliflower also seemed to be breaded and not battered and the sweet chili sauced seemed like the same bottled sauce as Mozart.

 Later that day we grabbed a quick early early dinner at Foozo. The food did take a bit of time but was generally pretty good. The pizza topping options were creative and the sauce and crust overall pretty good, although it could have been just a tad thicker as it got a bit soggy. The fries were a bit of let down though, as they seemed to be a mass produced frozen product.
 We stopped at Serendipity in Wynwood for some ice cream before leaving but they were closed to do a pop-up event offsite. So we walked up the street and grabbed some pastries from the popular Zak the Baker. One of these days I will get to his new restaurant, as we had been to their old location a few years ago, and their stuff is the real deal, laden with rich butter and flaky puff pastry.
 Who doesn’t love latkes, but definitely don’t serve these with apple sauce as they definitely are not your bubbie’s. After eating what feels like nothing but carbs for a few days, I wanted something a little lighter. Enter cauliflower. And yes, I know I am encroaching on Rachel’s territory, but I think I have done a good job of putting my own spin on it.


 This pizza is one of my wife’s favorites. It does take a little bit of time to made the roasted garlic and caramelized onions, but that can be done ahead of time. Roasted garlic and caramelized onions have a million uses. I love roasted garlic baked in to a crusty homemade loaf of bread, and caramelized onions make a great topping for hot dogs and hamburgers.

 Before we get to the fried pickles I want to say congratulations to Anita Jude of Ashland, KY. She is the lucky winner of our

 A few months back Rachel and I attended the


 When it comes to Passover (AKA Pesach), most families have more traditions than Fiddler on the Roof. I was all set to make you a super traditional matzo ball with homemade chicken


You must be logged in to post a comment.